Appendix A — Contributing to Mass Spec Academy
You can contribute to Mass Spec Academy by writing new material or editing existing content. The best way to do this and see how your new content will look is to use the Quarto publishing system and download and submit content through our GitHub repository.
Overview
We are using Quarto to render our instructional materials as user-friendly web and pdf documents. It’s free and open source, and it’s designed for open science projects like ours. Quarto lets you use all the components of a traditional academic manuscript or textbook, like text organized into chapters and sections, figures and tables with captions, equations with numbers, and references to cited work and to all those chapters/sections/equations/figures.
But wait, there’s more: you can add movies, links to content from other chapters, code that drives computations and visualizations, callout blocks (like the topical side-boxes you see in textbooks, but with more options), and much else. Quarto renders this content both as a nice-looking webpage with lots of navigational features, and as a pdf file.
You can find nice examples of Quarto-authored books here:
Software Installation
To author new or edit existing content on your computer, you’ll need to install some software. This tutorial will help you get set up — please skip installs for any software you already have. You will need:
- Conda to organize and manage our code tools
- VSCode to write content
- The Quarto Command Line Interface (CLI)
- and the Quarto VS Code extension
- GitHub Desktop as a user-friendly interface with GitHub (optional)
Step 1: (Mini)conda
We’ll use conda to keep track of all the smaller software packages that get used to create our source material. If you have already downloaded Anaconda for some previous data/science work, then great, you’re all set! If not, you can download a smaller version without all the extra tools we won’t use, called Miniconda.
This is the most involved install, so we’re doing it first. The others are easy. Go to https://www.anaconda.com/download/success, scroll down past the Anaconda installers, and choose the Miniconda installer for your operating system. There is a Python version next to this, but don’t worry about it, there’s no Python involved here. If you’re still reading this text, you probably want the “Graphical Installer” option. Note that DO NOT need to send your email address to anaconda.com to download or use this.
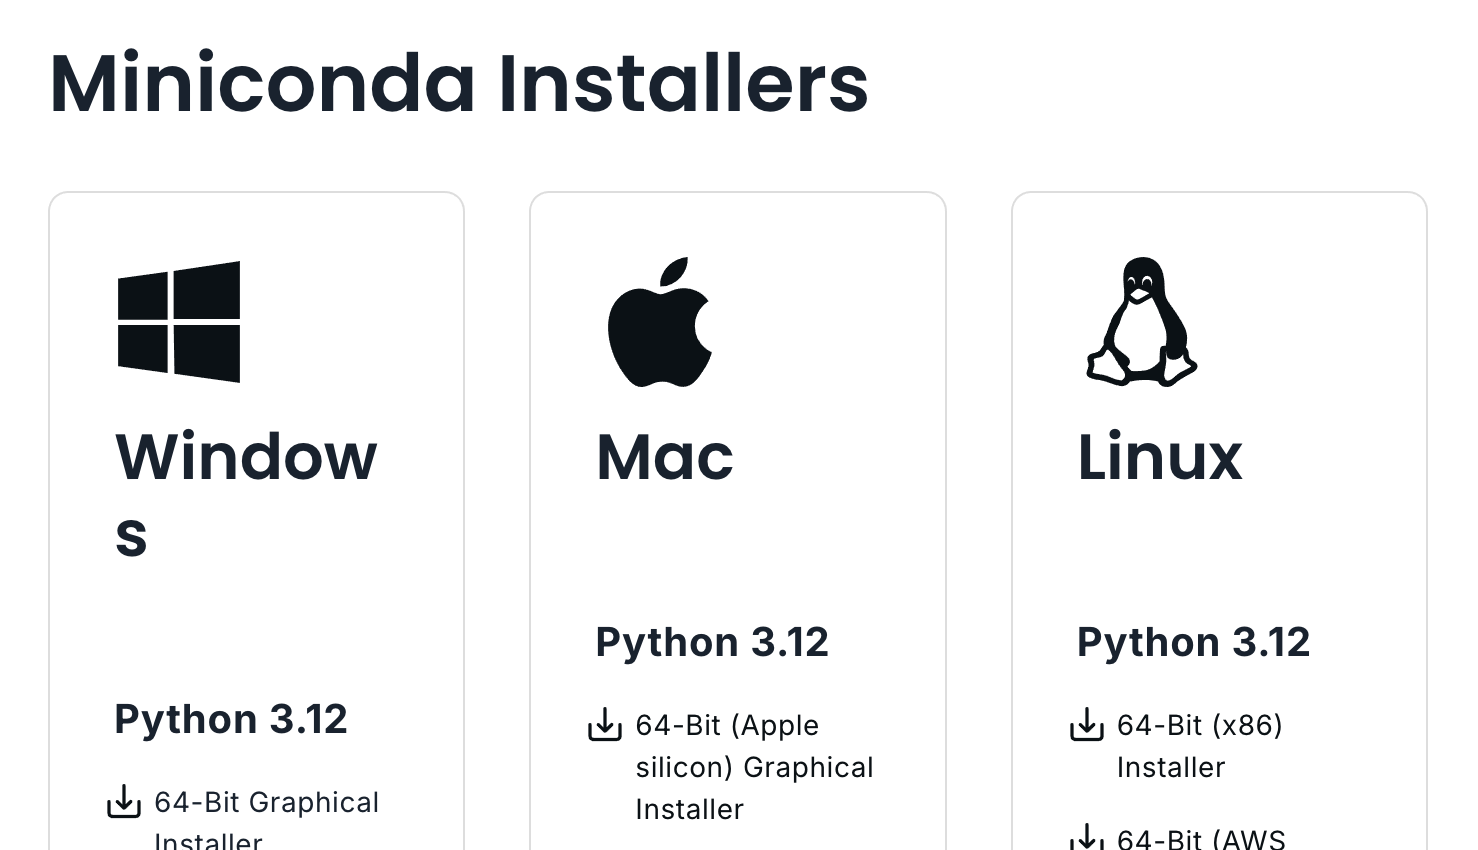
More detailed instructions for Miniconda installation are here for each OS under “Basic install instructions.” In short, the instructions are to choose an install path with no spaces (the default is a good idea).
For Windows, you’ll also want to
- install for “Just Me” instead of “All Users,”
- create shortcuts (selected by default) for Anaconda Prompt packages, and
- do not “Add Miniconda3 to my PATH variable”
That wasn’t so bad, right?
Step 2: VS Code
You can use any editor you want for Quarto, but this tutorial will show you how to set up Microsoft Visual Studio (VS) Code. It’s free, “built from open source,” and it’s widely used.
You can consider yourself a hacker once you download VS Code from https://code.visualstudio.com/download. If you don’t know which of the buttons to choose for your operating system, then click on the big button. VS Code is smallish (< 200 MB download, < 500 MB disk space).
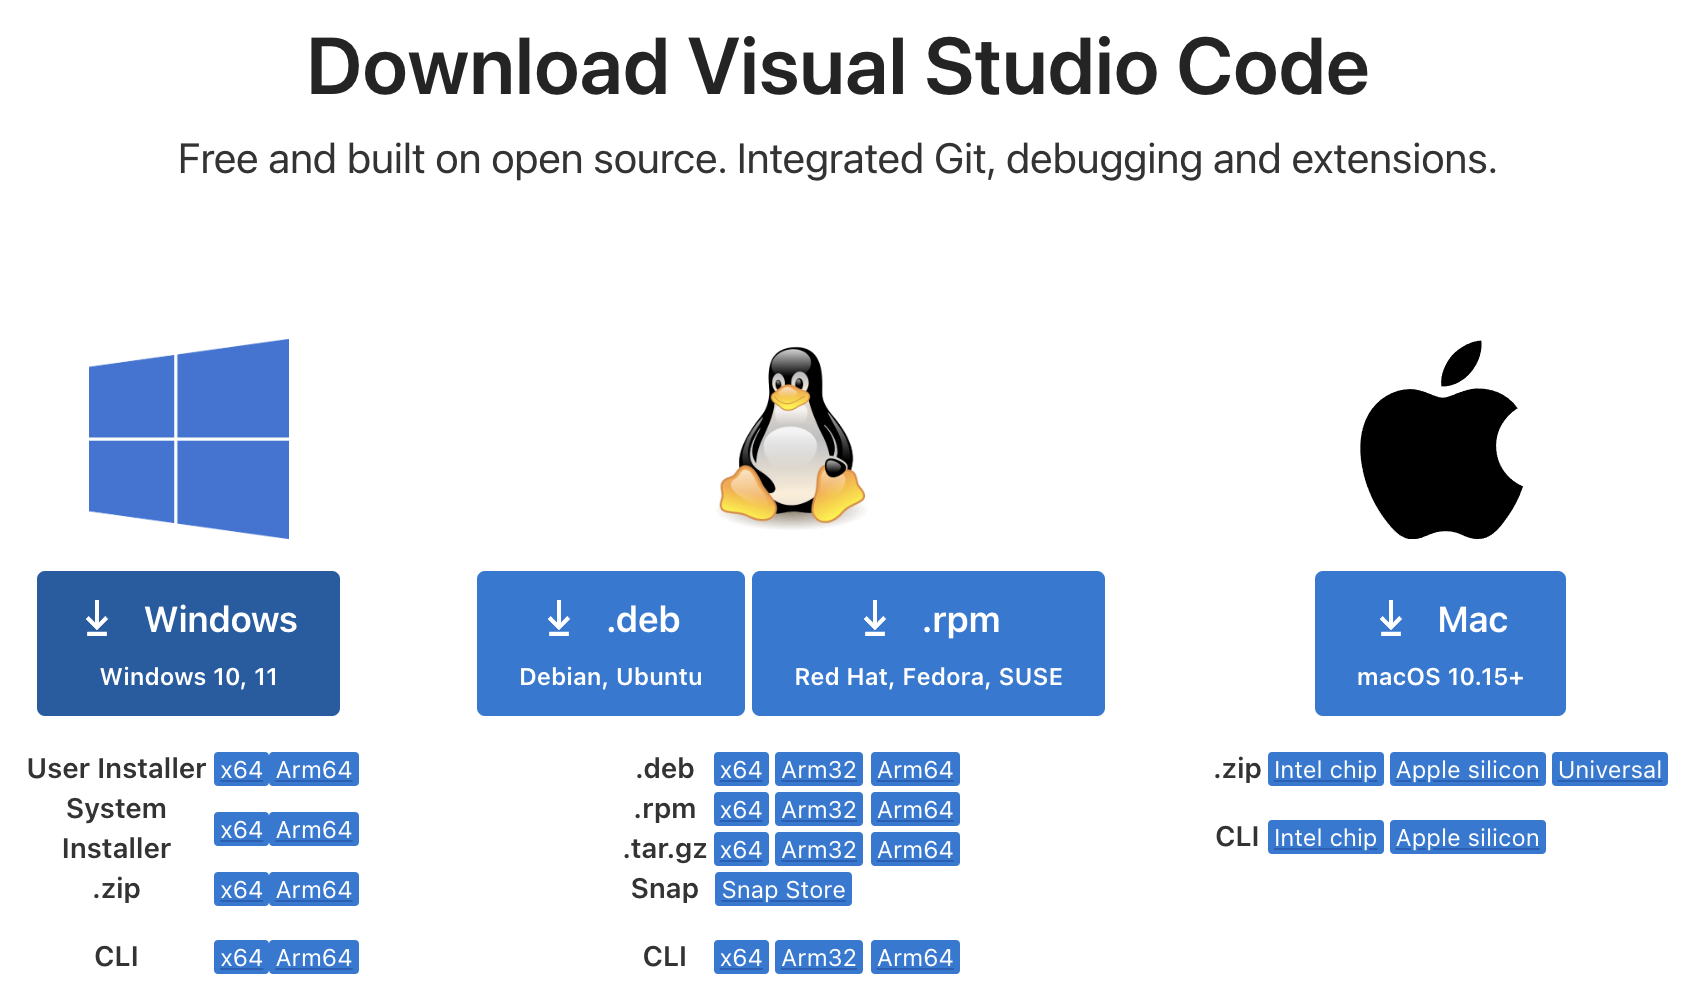
Install VSCode and follow the prompts. We’ll add extensions and additional components later.
Step 3: Quarto CLI
Download the Quarto Command Line Interface (CLI) from https://quarto.org/docs/get-started/ for your operating system. Install and follow the installer instructions. This is another small-ish ~200 MB installer. To update Quarto when a new version is released, you’ll need to download the new installer from this website and install it again.
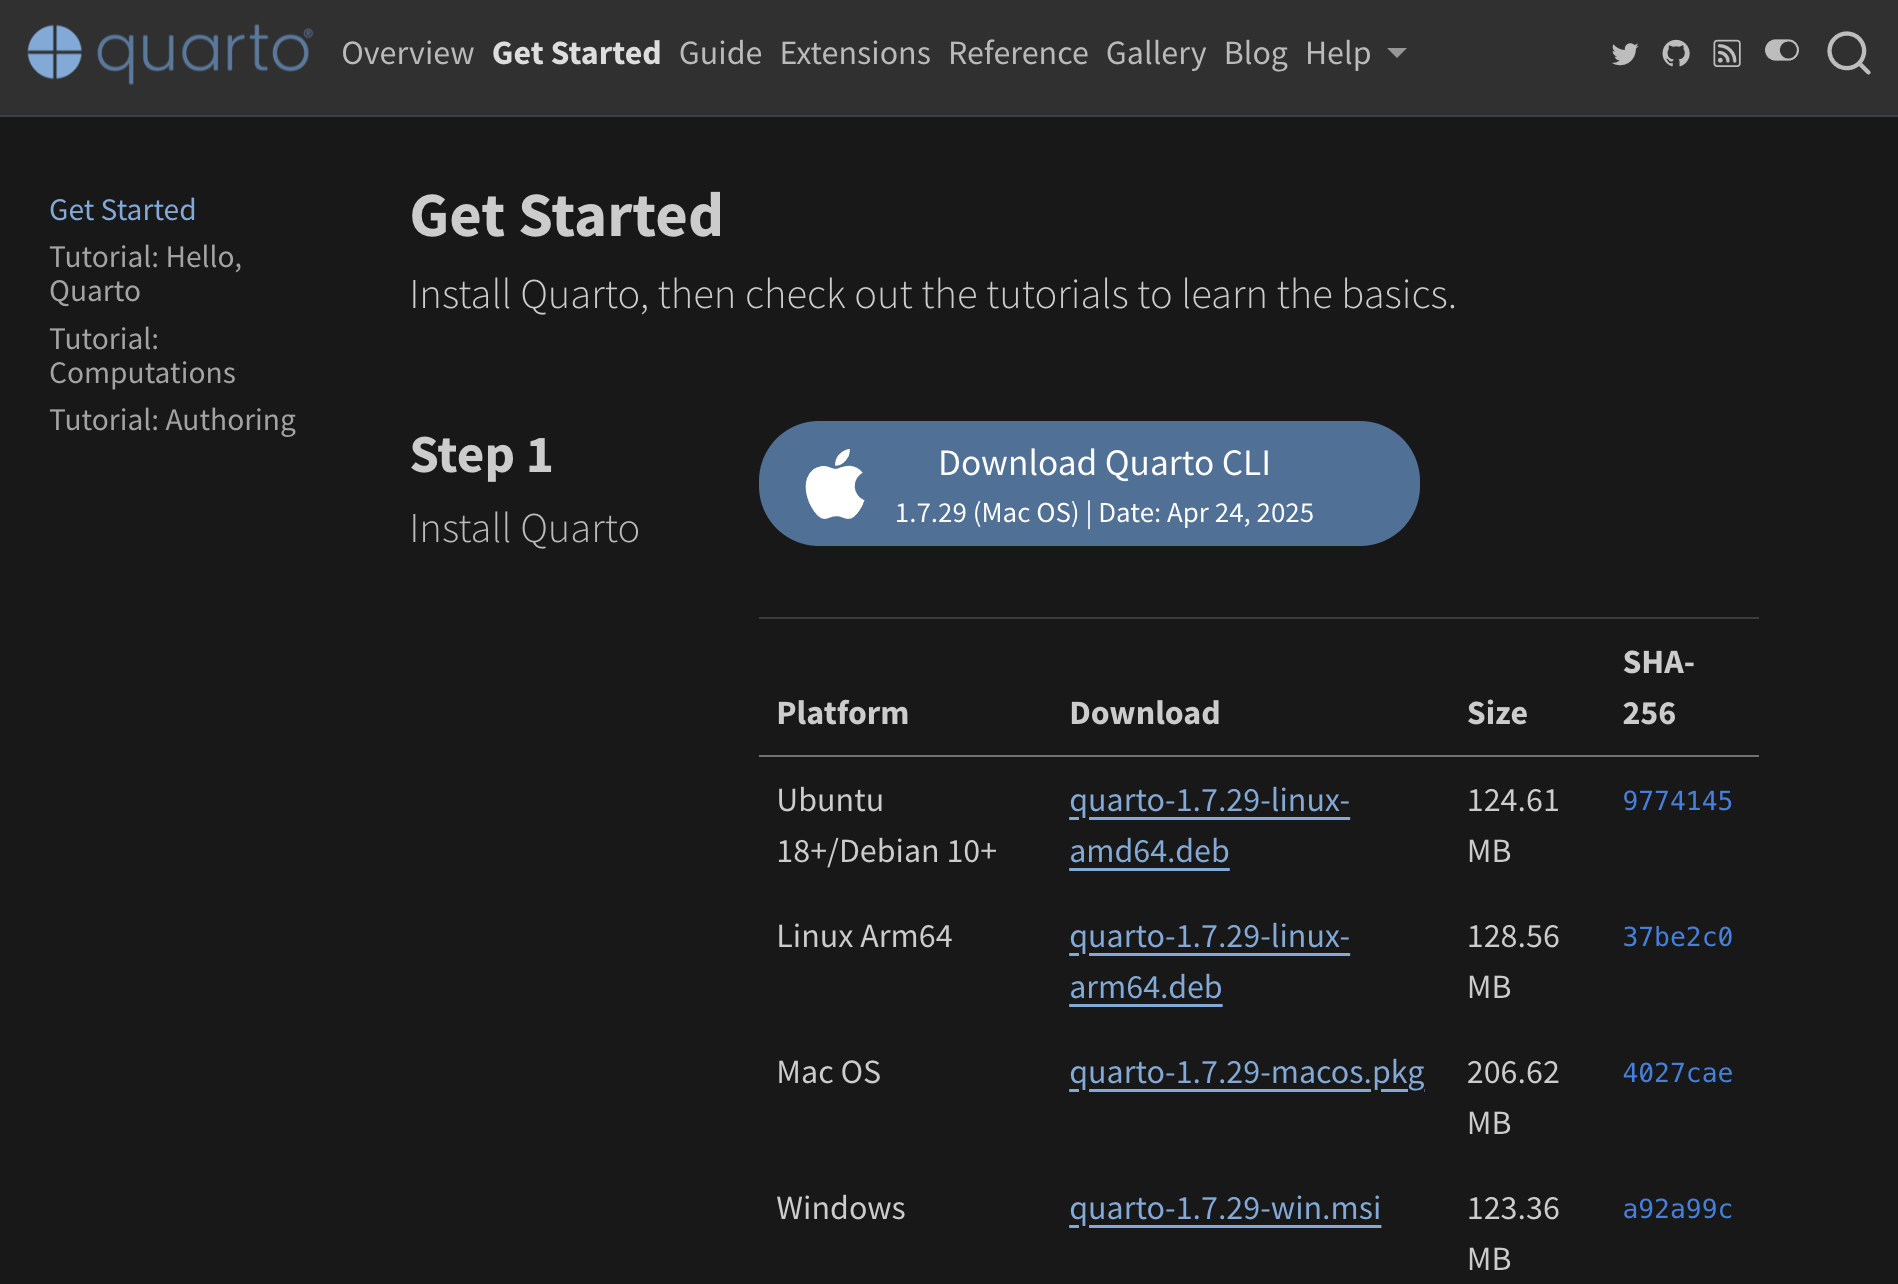
Quarto is what will turn the text we write in VS Code into content that looks pretty on the web, both on desktops and on mobile screens, and a pdf.
Step 3A: Add the Quarto VS Code Extension
Open VS Code and then find the Extensions button on the left sidebar. It looks like some squares with the NE square levitating.
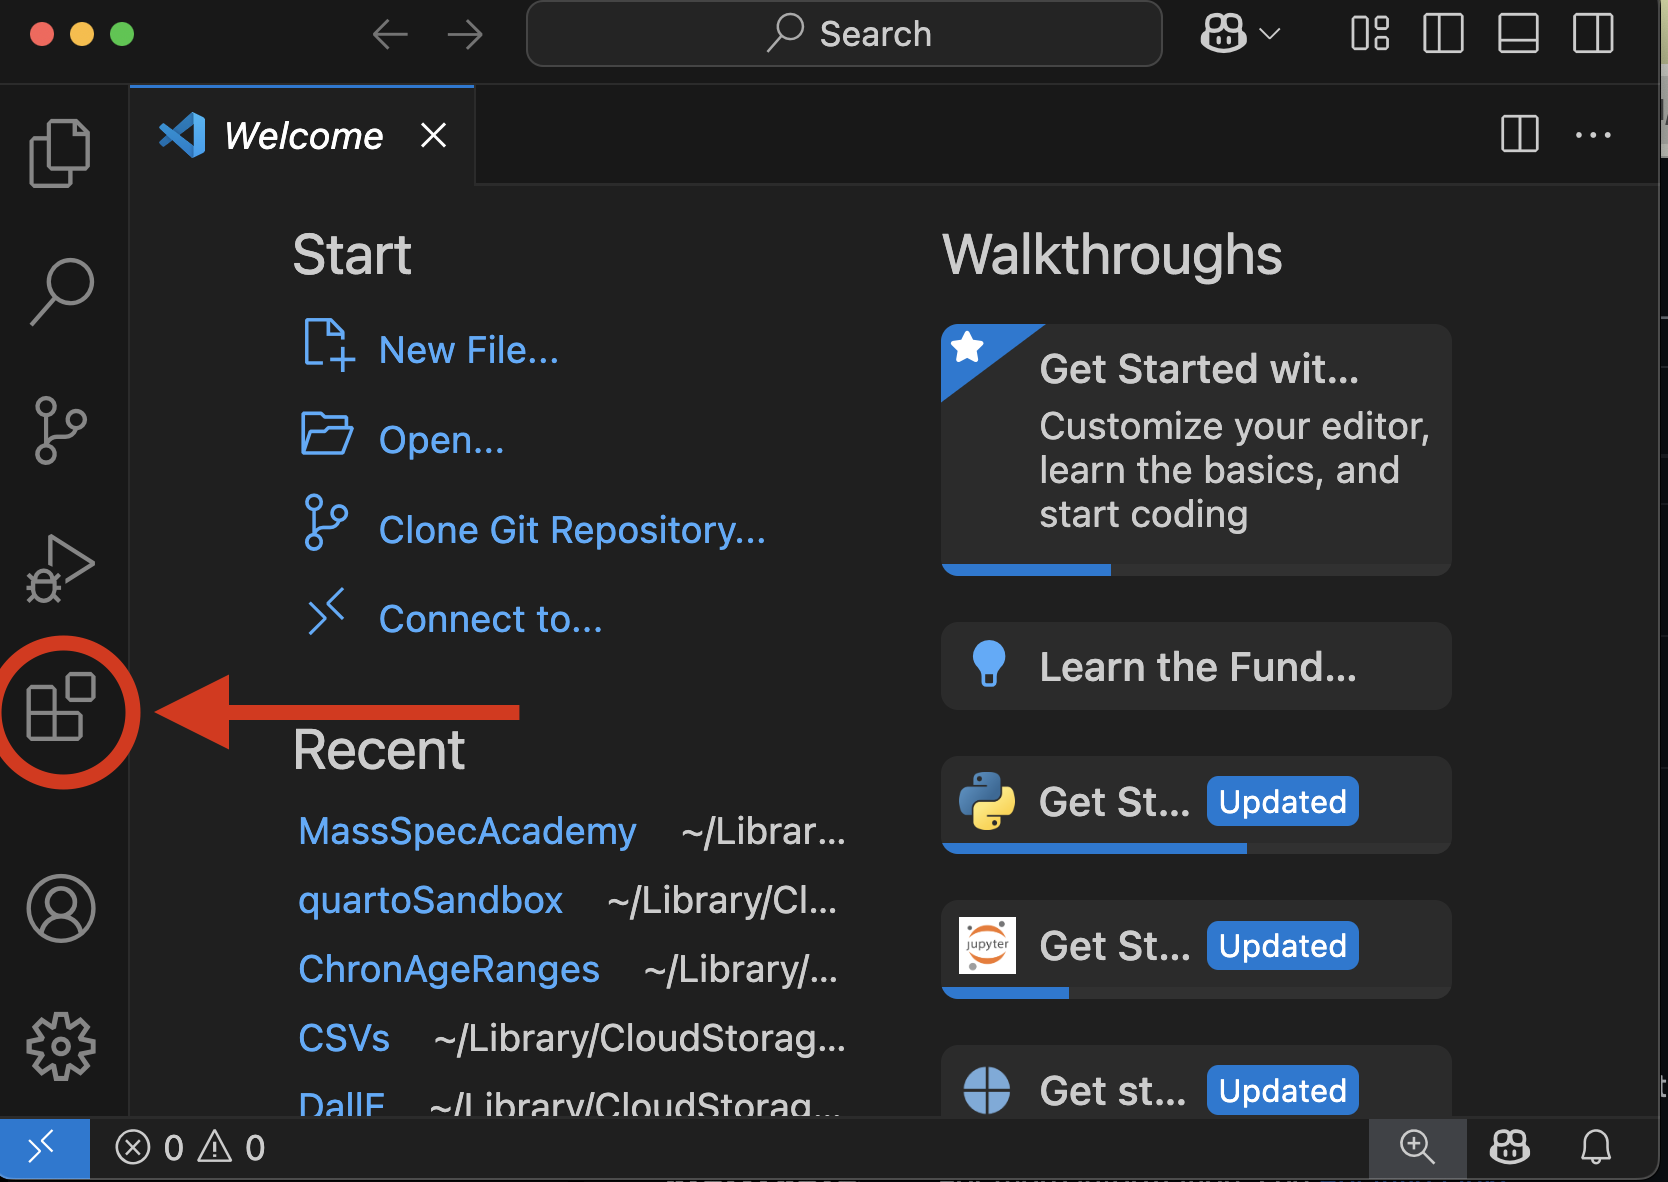
Then, click inside the Search bar and type “Quarto.”
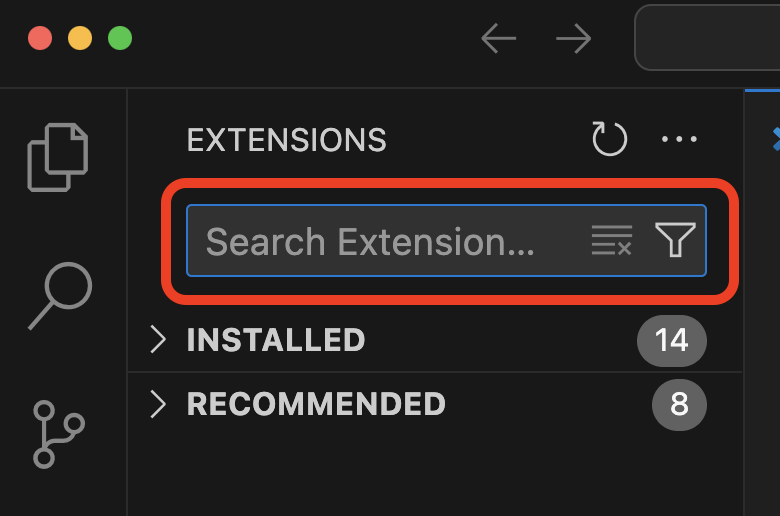
You’ll see the Quarto extension up first. Click on the extension to open an information window, then click the Install button on this window. You’ll need the Quarto CLI installed in order to make the VS Code extension work.
The Quarto extension lets VS Code recognize your Quarto-formatted files, then makes it easier to edit those files. It colors your text based on its purpose (headers, links, images, code), lets you drag and drop image files into documents, and provides a preview of your work with the click of a button.
Step 4: GitHub Desktop
We will use the version control software Git, and we will host all of our content, like writing and figures, on GitHub.com. All current and previous versions of content on GitHub are publicly available through the GitHub.com website. Additionally, GitHub serves the website version of our project, for free, through GitHub Pages. Changes to the project that are pushed up to GitHub repository are automatically rendered to the website. If this makes no sense now, don’t worry.
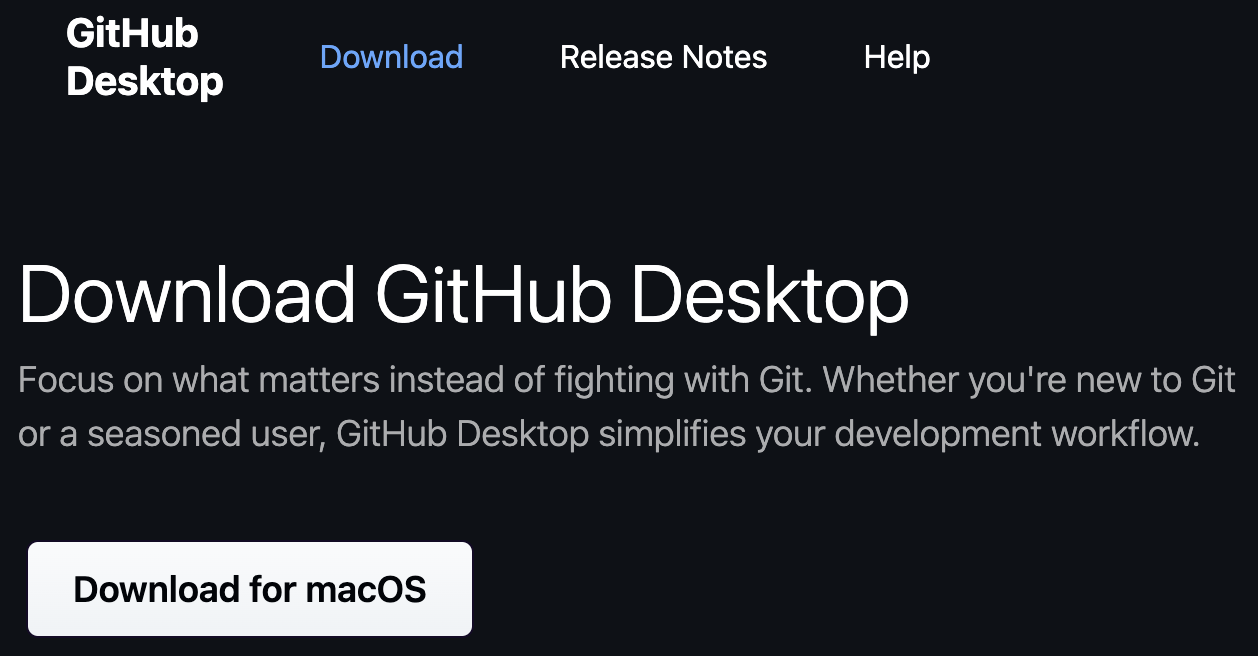
The easiest way to download and install Git and to start working with our GitHub repository is to download the GitHub Desktop app from https://desktop.github.com/download/. GitHub knows what operating system you’re using, and probably what you ate for lunch last Wednesday, so just click the button to download.
You will need to sign in with a GitHub.com username and password. Create one if you don’t already — sorry, this is the only new login you’ll need for this project.
Getting started!
Now that you’ve installed all the software you need, we will download the current version of the project onto your computer using GitHub Desktop, install the packages it depends on using conda, and then open it for editing in VS Code.
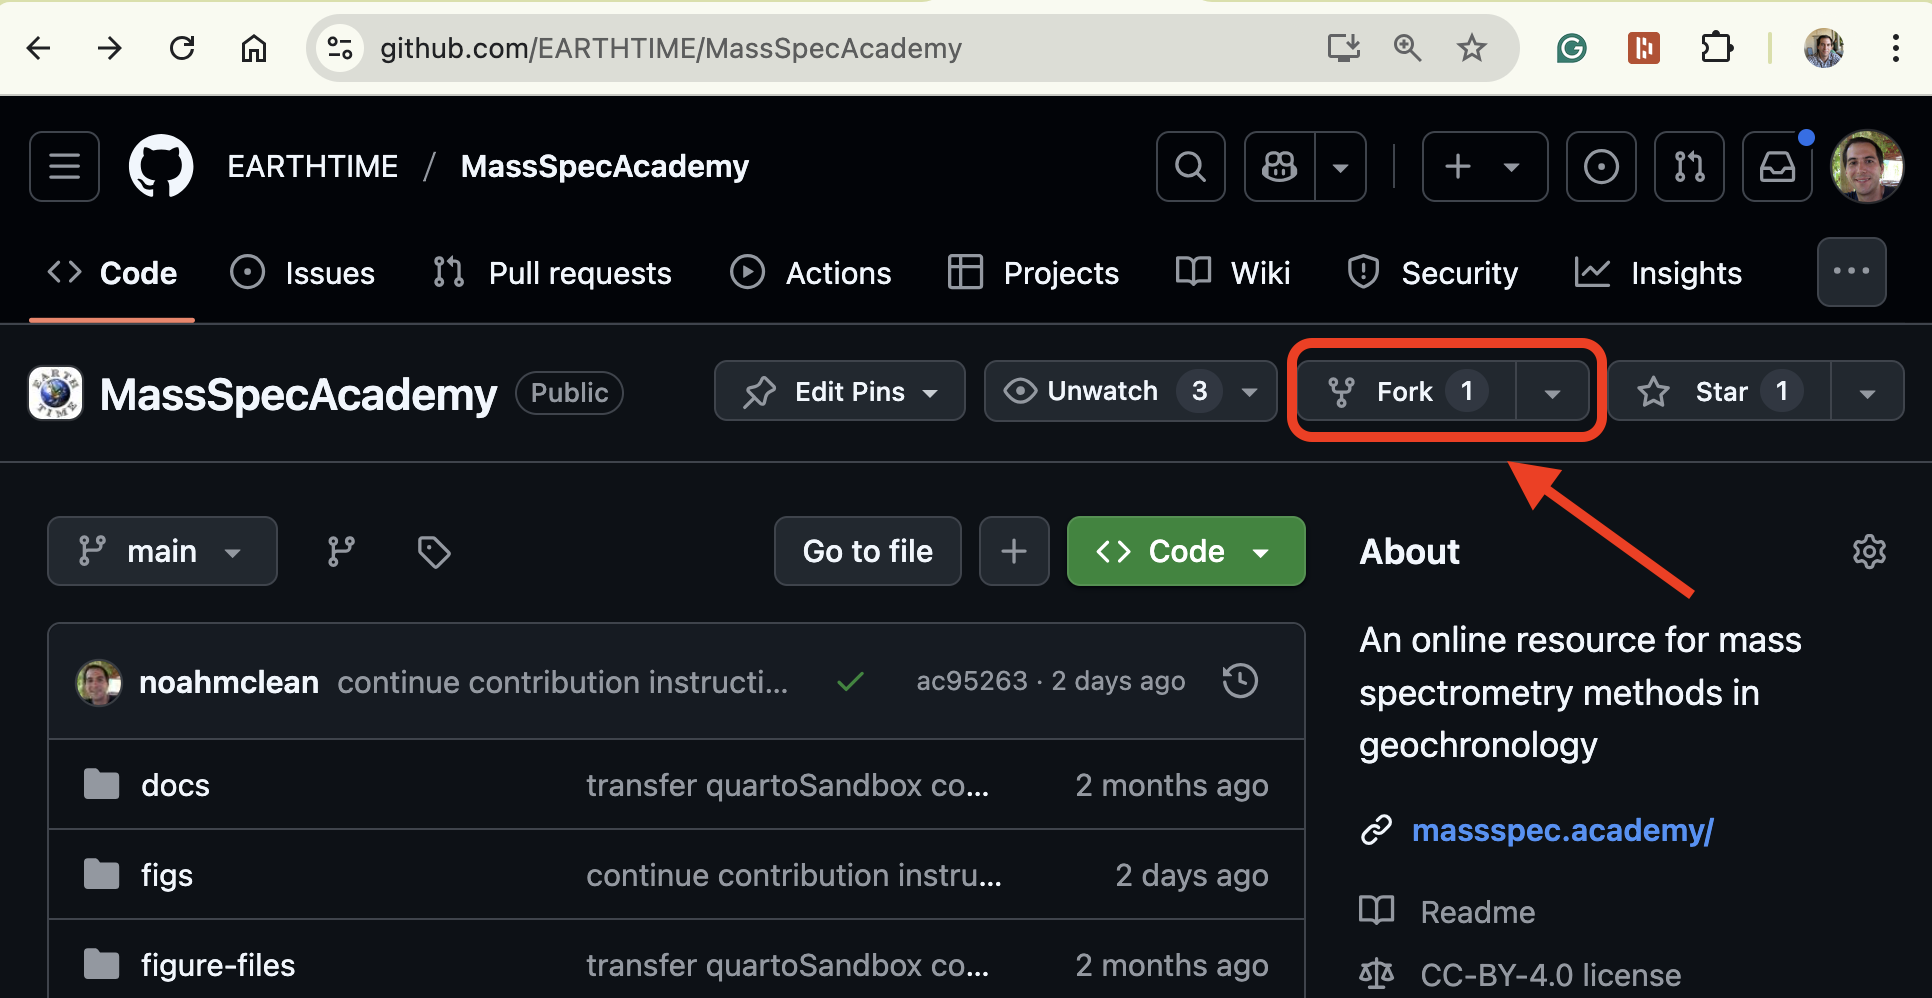
1. Fork the MassSpecAcademy GitHub repository
Sign in to GitHub.com with your username and password, then navigate to https://github.com/EARTHTIME/MassSpecAcademy. Find and click the ‘Fork’ button at the top right of the screen.
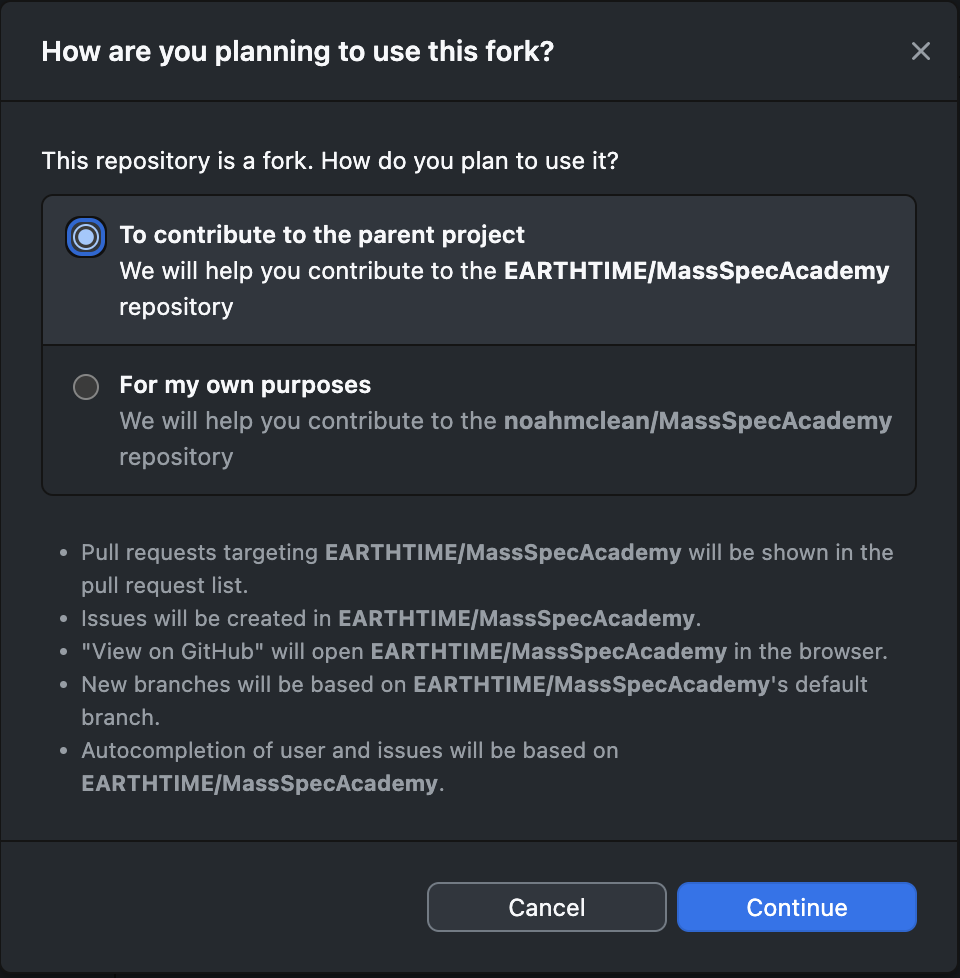
Press the Green “Create Fork” button at the bottom left of the next screen to create your own copy of the MassSpecAcademy repository on your own GitHub account. Now open the GitHub Desktop App, click the sign in with your GitHub username and password, and then from the “File” menu, choose “Clone Repository…”
In the window that pops up, find your new personal copy of the MassSpecAcademy repository in the list of repositories from GitHub.com. This repository will be a single folder with all the files and subfolders of Mass Spec Academy inside it. Choose a Local Path for this folder (the default is usually good), then click the blue Clone button.
Next, a window from GitHub Desktop will pop up and ask you how you want to use the repository. You want to contribute to the parent project, so keep the radio button in its top position and hit Continue.
You now have a copy of Mass Spec Academy on your own computer!
2. Create a new branch for your edits
Quick workflow overview:
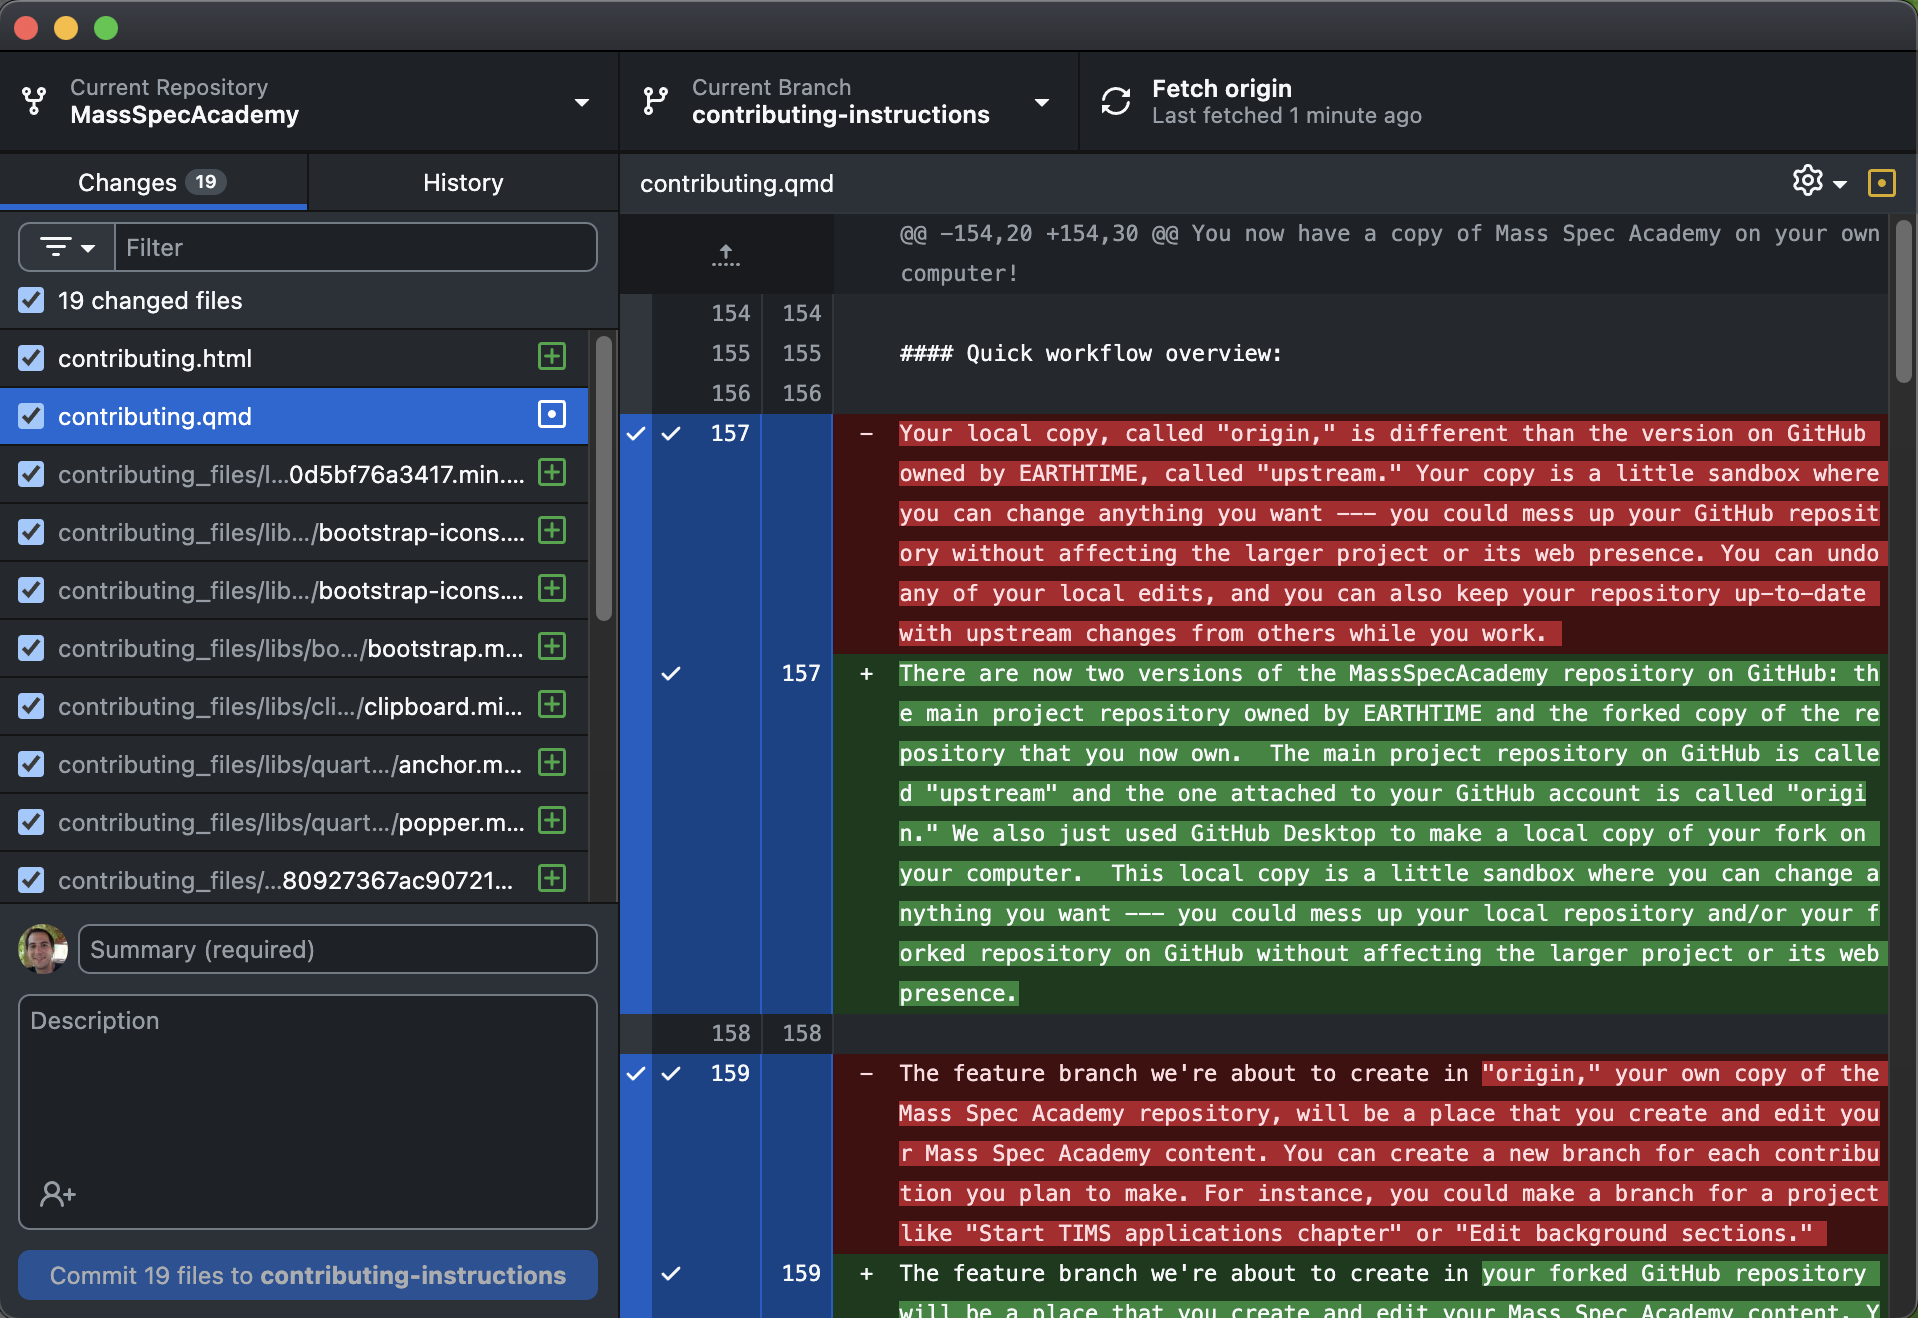
There are now two versions of the MassSpecAcademy repository on GitHub: the main project repository owned by EARTHTIME and the forked copy of the repository that you now own. The main project repository on GitHub is called “upstream” and the one attached to your GitHub account is called “origin.” We also just used GitHub Desktop to make a local copy of your fork on your computer. This local copy is a little sandbox where you can change anything you want — you could mess up your local repository and/or your forked repository on GitHub without affecting the larger project or its web presence.
The feature branch we’re about to create in your forked GitHub repository will be a place that you create and edit your Mass Spec Academy content. You can create a new branch for each contribution you plan to make. For instance, you could make a branch for a project like “Start TIMS applications chapter” or “Edit background sections.” You’ll use GitHub desktop to package up each small batch of edits as a “commit” and to synchronize the edits on your local computer with your forked GitHub repository online.
When you’re at a place with your project where you want to merge your edits with the “upstream” main repository, you will create a Pull Request using the instructions below. This alerts the project maintainers (currently Stephen Cox and Noah McLean) that your content is ready. The maintainers can review your content, make suggestions or edits with the opportunity for a group discussion, and then merge your content into the main project. The merge will become visible to everyone else working on the project, and it will automatically update the website and pdf document. Now you can make a new branch for your next set of edits!
Create your new feature branch.
In GitHub Desktop, find the “Branches” dropdown menu in the middle of the top of the app window. Click anywhere in the button to make the dropdown menu appear, and click the “New Branch” button at its top right.
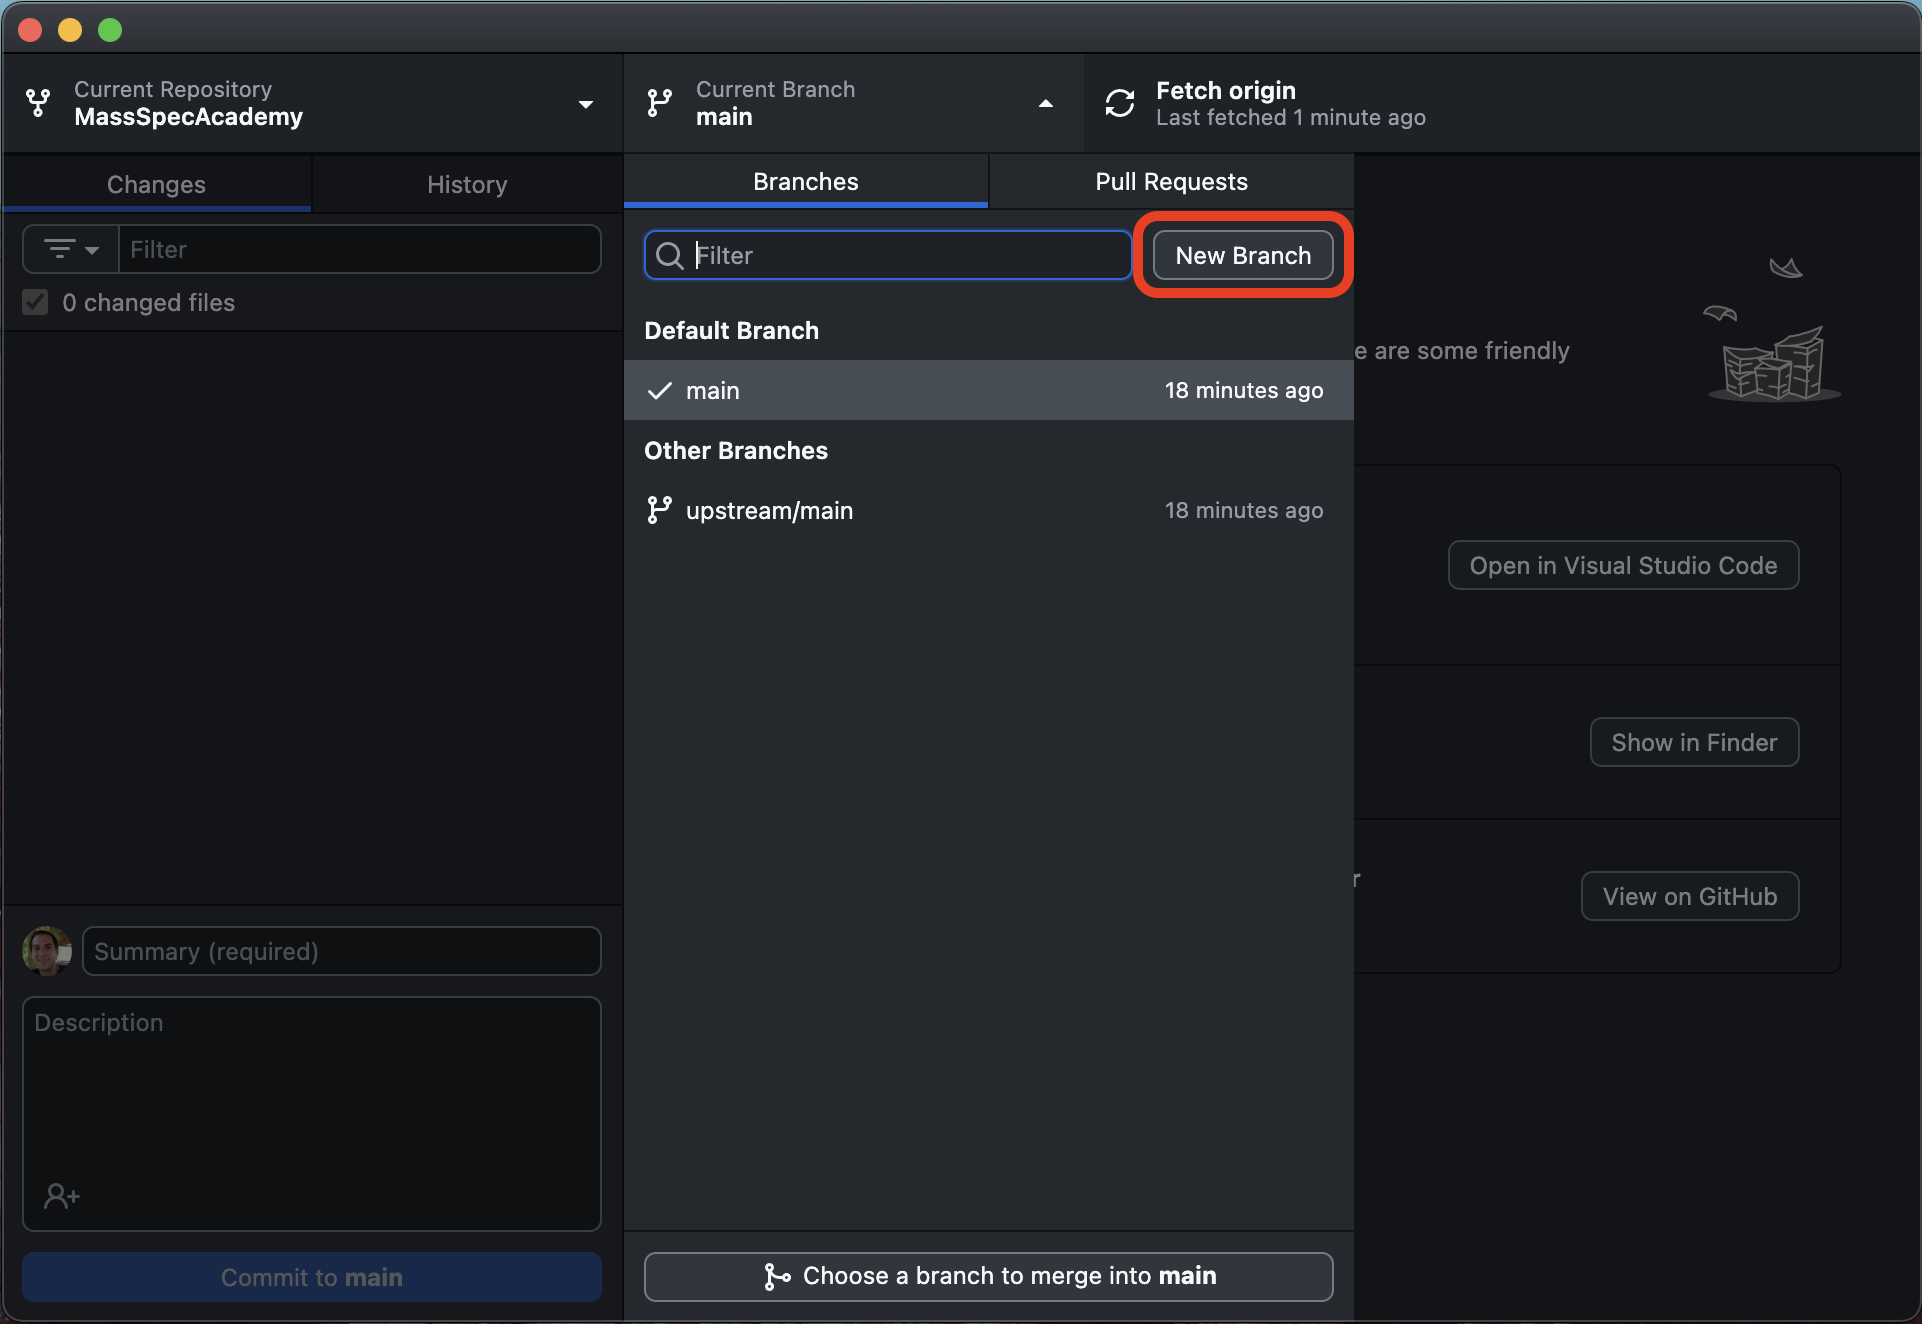
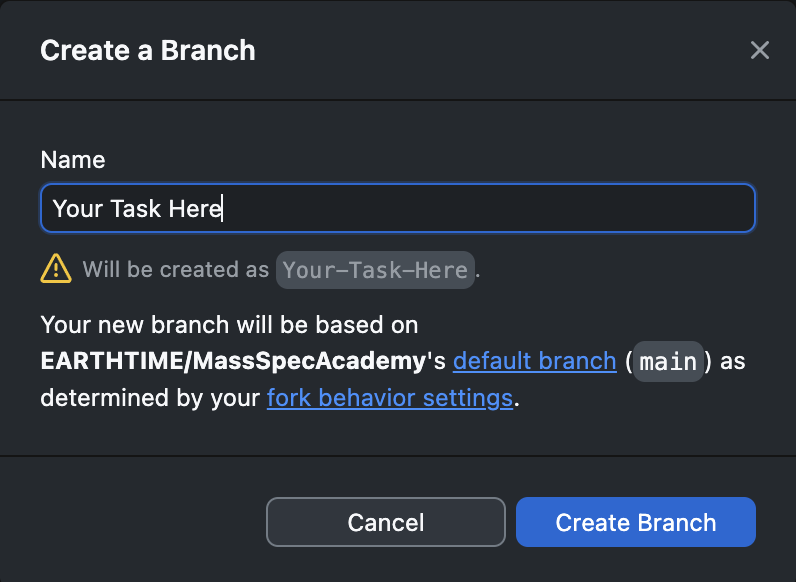
Type in a name for your feature branch that describes the work you’re about to do, or just “testing” if you want to try it out. Hit enter to create your new branch, and you’re off to the races.
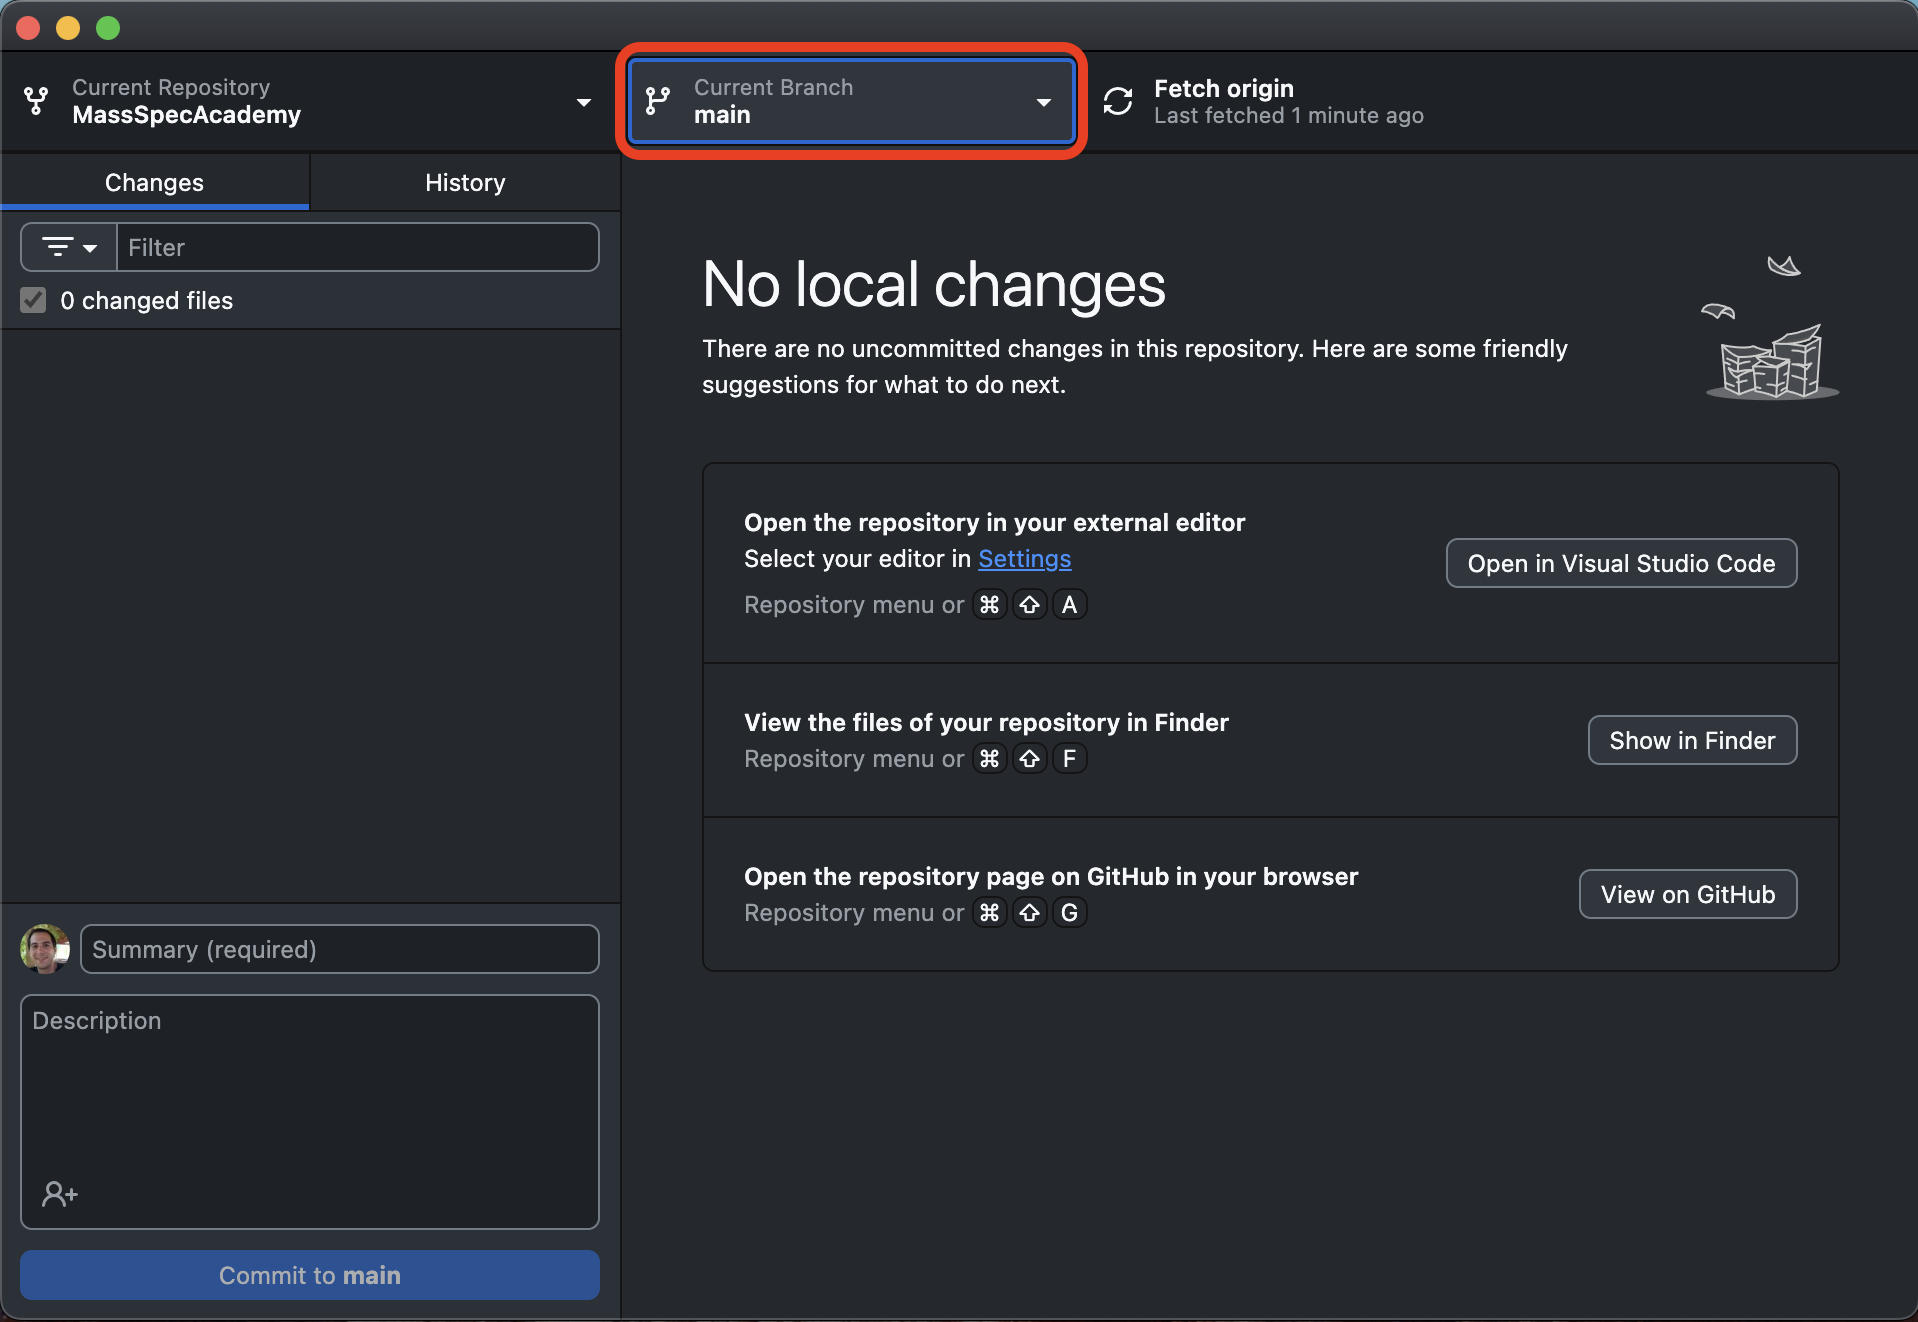
As long as the name of your branch is showing under the “Current Branch” button on GitHub Desktop, your edits will belong to this branch.
3. Use conda to download dependencies
In order to reproduce the Mass Spec Academy website and run all of its code blocks, like the ones planned for its data and statistics chapters, you’ll need to install Python and some packages. This is easy with conda.
On a Mac, navigate in Finder to your new MassSpecAcademy folder that contains our local git repository. Then right-click on the MassSpecAcademy folder and, down the list of options, choose “New Terminal At Folder”.
On Windows, navigate in Windows Explorer to the MassSpecAcademy folder you created with GitHub Desktop. Copy the folder location from the address bar at the top of Windows Explorer. Now open the Anaconda Command Prompt application that was created when you installed Miniconda – it should be listed beside all your other applications, available from your Windows button. Type cd " (that is the letter cd, a space, then a double quotes), then paste in the path you copied, then type a second " to close the quotes. Hit the enter key.
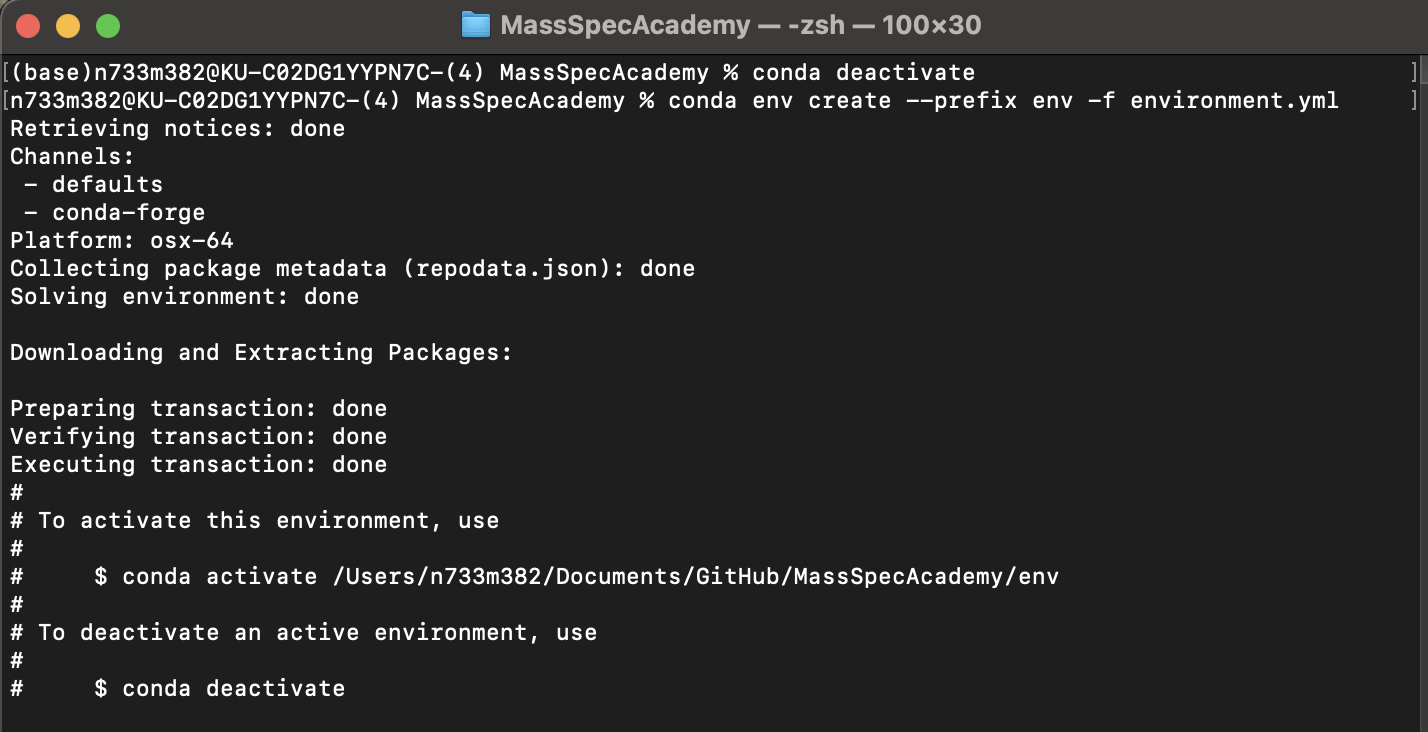
On Windows or a Mac, you should now see a blinking cursor to the right of some text that starts with (base) and ends with MassSpecAcademy, the name of your current folder, like this:
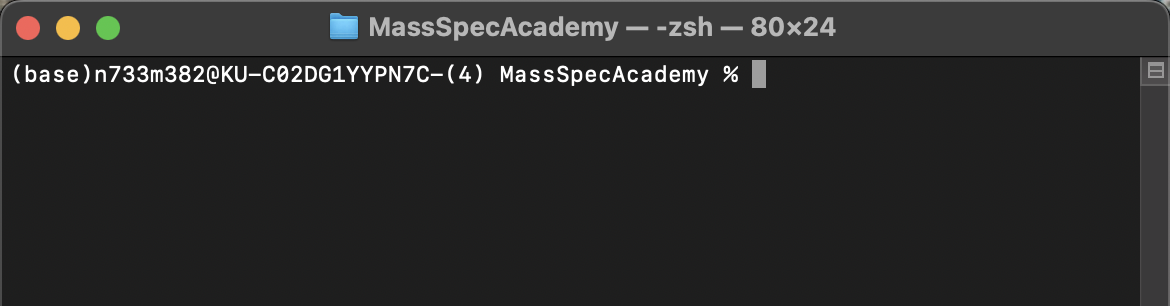
First, type conda deactivate, and hit enter. The (base) at the beginning of the line should disappear.
Now, copy and paste this text at that blinking cursor, then hit enter:
conda env create --prefix env -f environment.ymlWhen you hit enter, conda will think some and tell you what it is up to, i.e., … “Retrieving notices,” “Solving environment,” “Collecting package metadata,” etc. After ten or twenty seconds, conda will output a few lines of instructions for activating and deactivating your new environment. You can ignore these — you’re done with conda and the command line for now. Your terminal should look something like this:
3. Open VS Code
Open the VS Code application you downloaded and installed earlier. From the File menu, select “Open Folder…” and then navigate to the “MassSpecAcademy” folder that contains the forked GitHub repository you created with GitHub Desktop. It’s probably in your Documents/GitHub folder. Select the MassSpecAcademy folder and then hit the Open button to open the folder.
You’re in! You’ll see a panel to the left with a file directory for the whole repository. You can double-click a file to open it for editing, or create a new Quarto .qmd file (right-click and choose “New File”, use a button near the top of the panel, or from the “File” menu).
There’s lots more on authoring Quarto content at https://quarto.org/docs/authoring/markdown-basics.html.
To preview your work, hit the “Preview” button at the top right of the VS Code window:
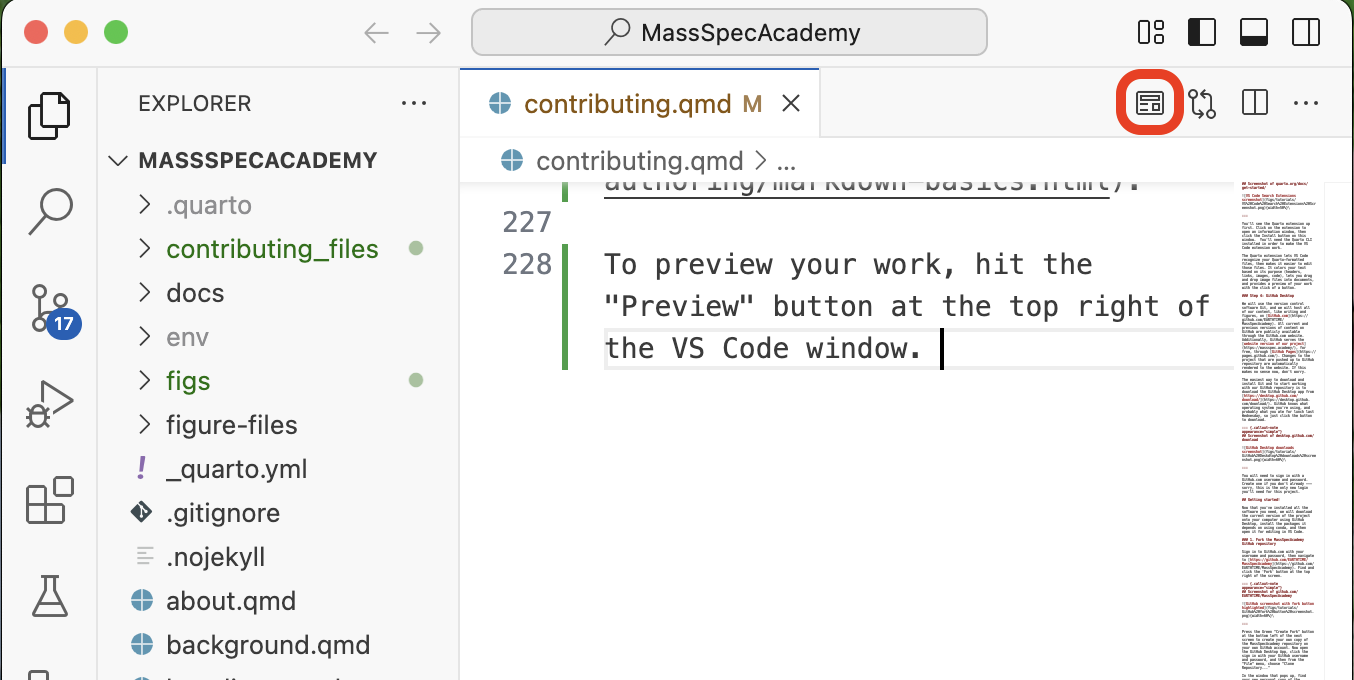
A preview panel will open on the right hand side of VS Code that you can resize to make readable. Another panel will open at the bottom that contains an integrated terminal window with output from Quarto about what it’s doing.
If you’ve previewed a file that is already part of the website, then you will wait a minute, then see an interactive preview of the entire website. If you have previewed a new .qmd file that is not yet attached to the website navigation, you will see a preview of this page only. Command or control-click the http://localhost:XXXX/ link that appears in the terminal window or copy the same text from the top of the preview window and paste it into a browser to preview your content in a web browser. You can hit preview as often as you like to preview your changes and make sure your content is rendering correctly.
4. Commit your edits on GitHub Desktop
When you’ve hit a natural stopping place, like completing some writing or editing a section, or you’re wrapping up and taking a long break, then it’s time to commit your work. Open GitHub Desktop and you’ll find that the left-hand panel titled “Changes” contains a list of all the files you’ve added, modified, or deleted. Each file will have a check box next to it, checked by default. The larger right-hand panel will show you all the changes you’ve made, with new content in green and deleted content in red.
Next, find the commit message area in the bottom left of the GitHub Desktop window. In the “Summary” bar, write a short summary of your edits (ideally < 50 characters), like “Add explanation of work function for TIMS.” In the the “Description” box below, you can optionally leave a concise explanation of your edits. The commit message will be preserved alongside your edits and will help everyone understand your proposed changes and find where/when content was edited in case changes need to be reverted.
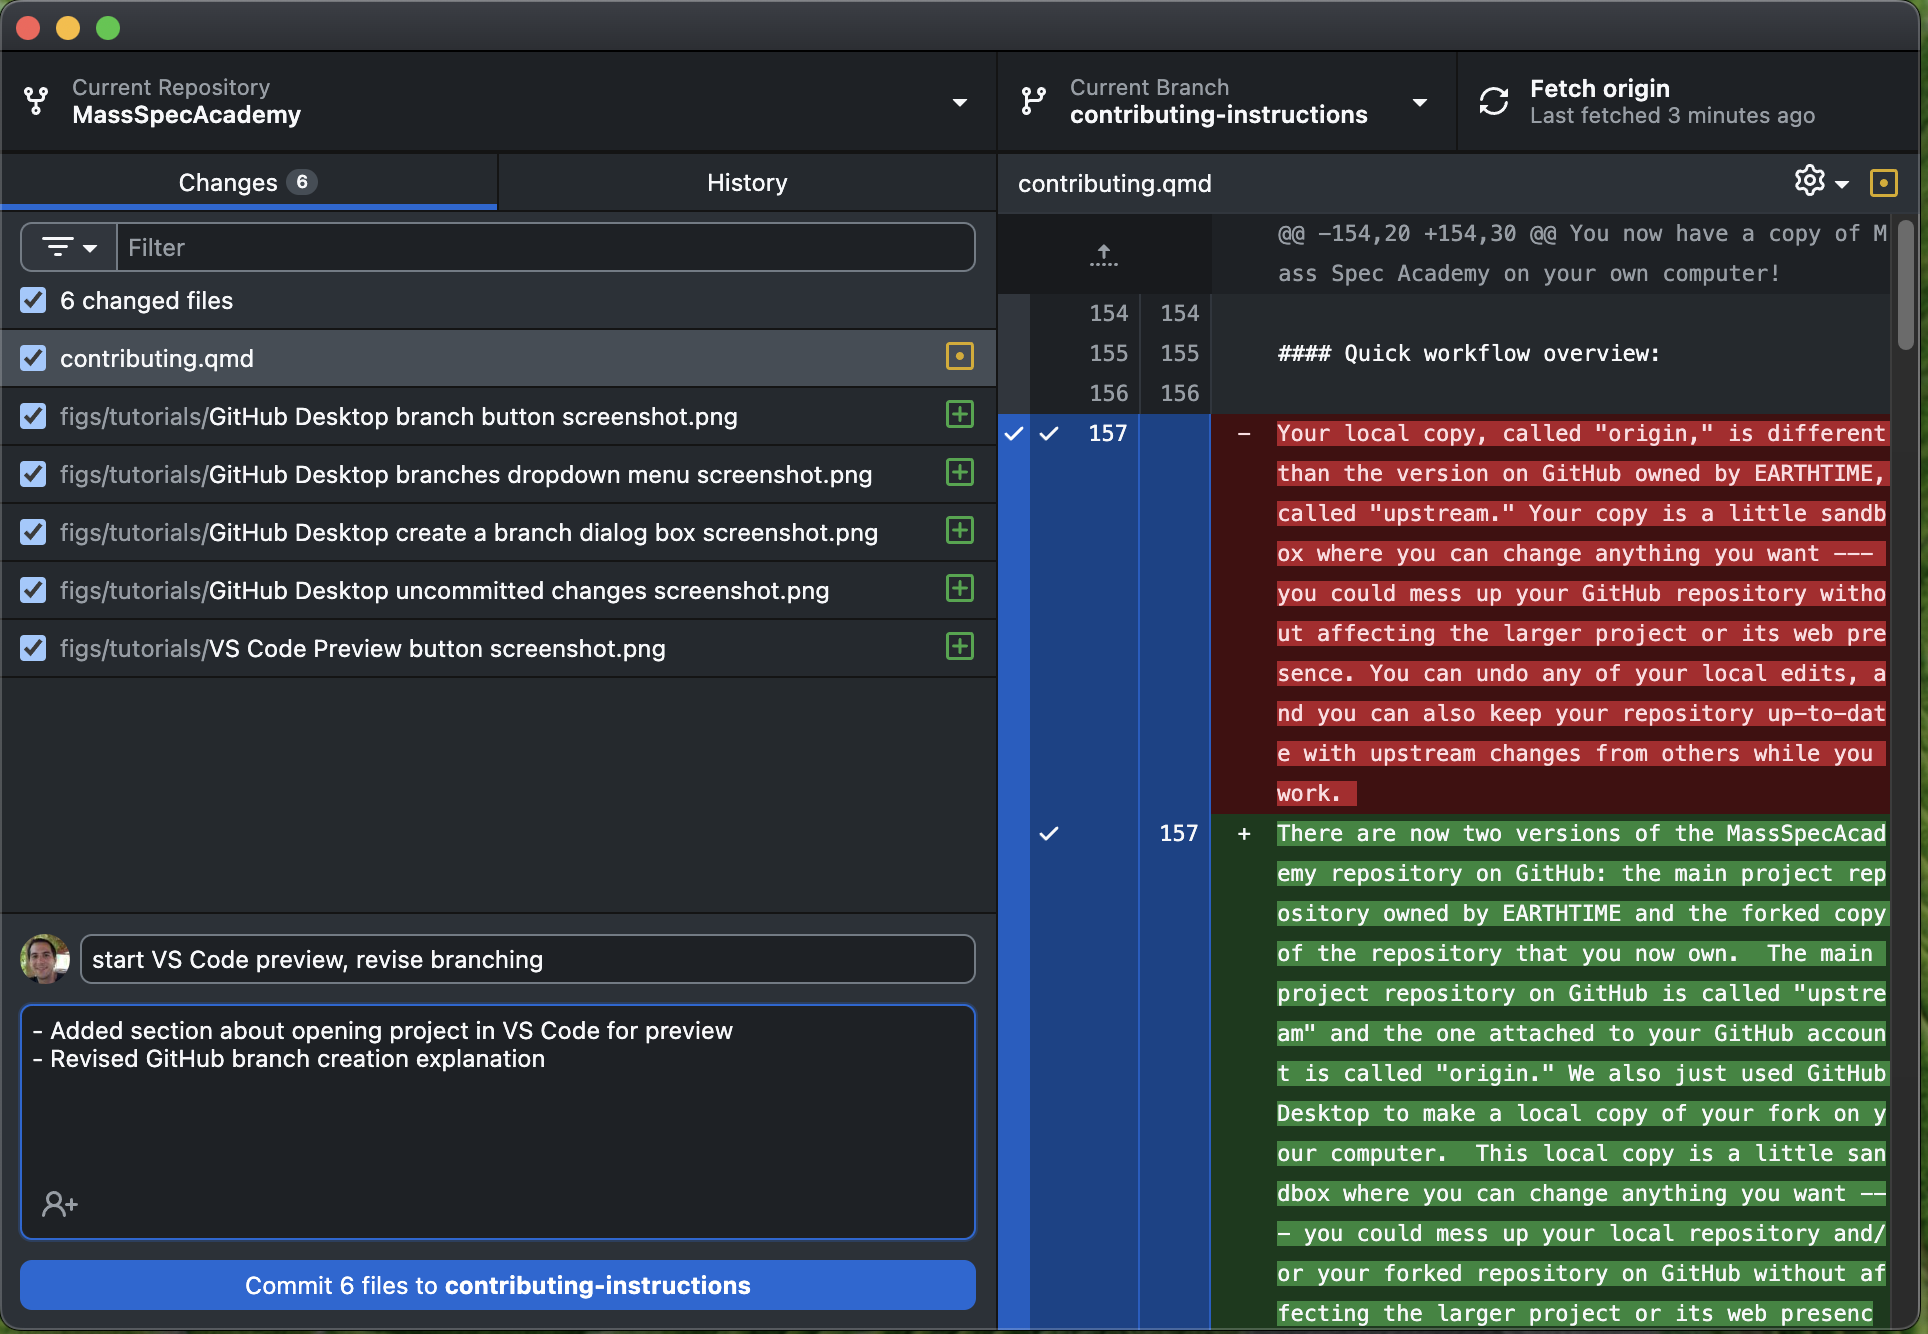
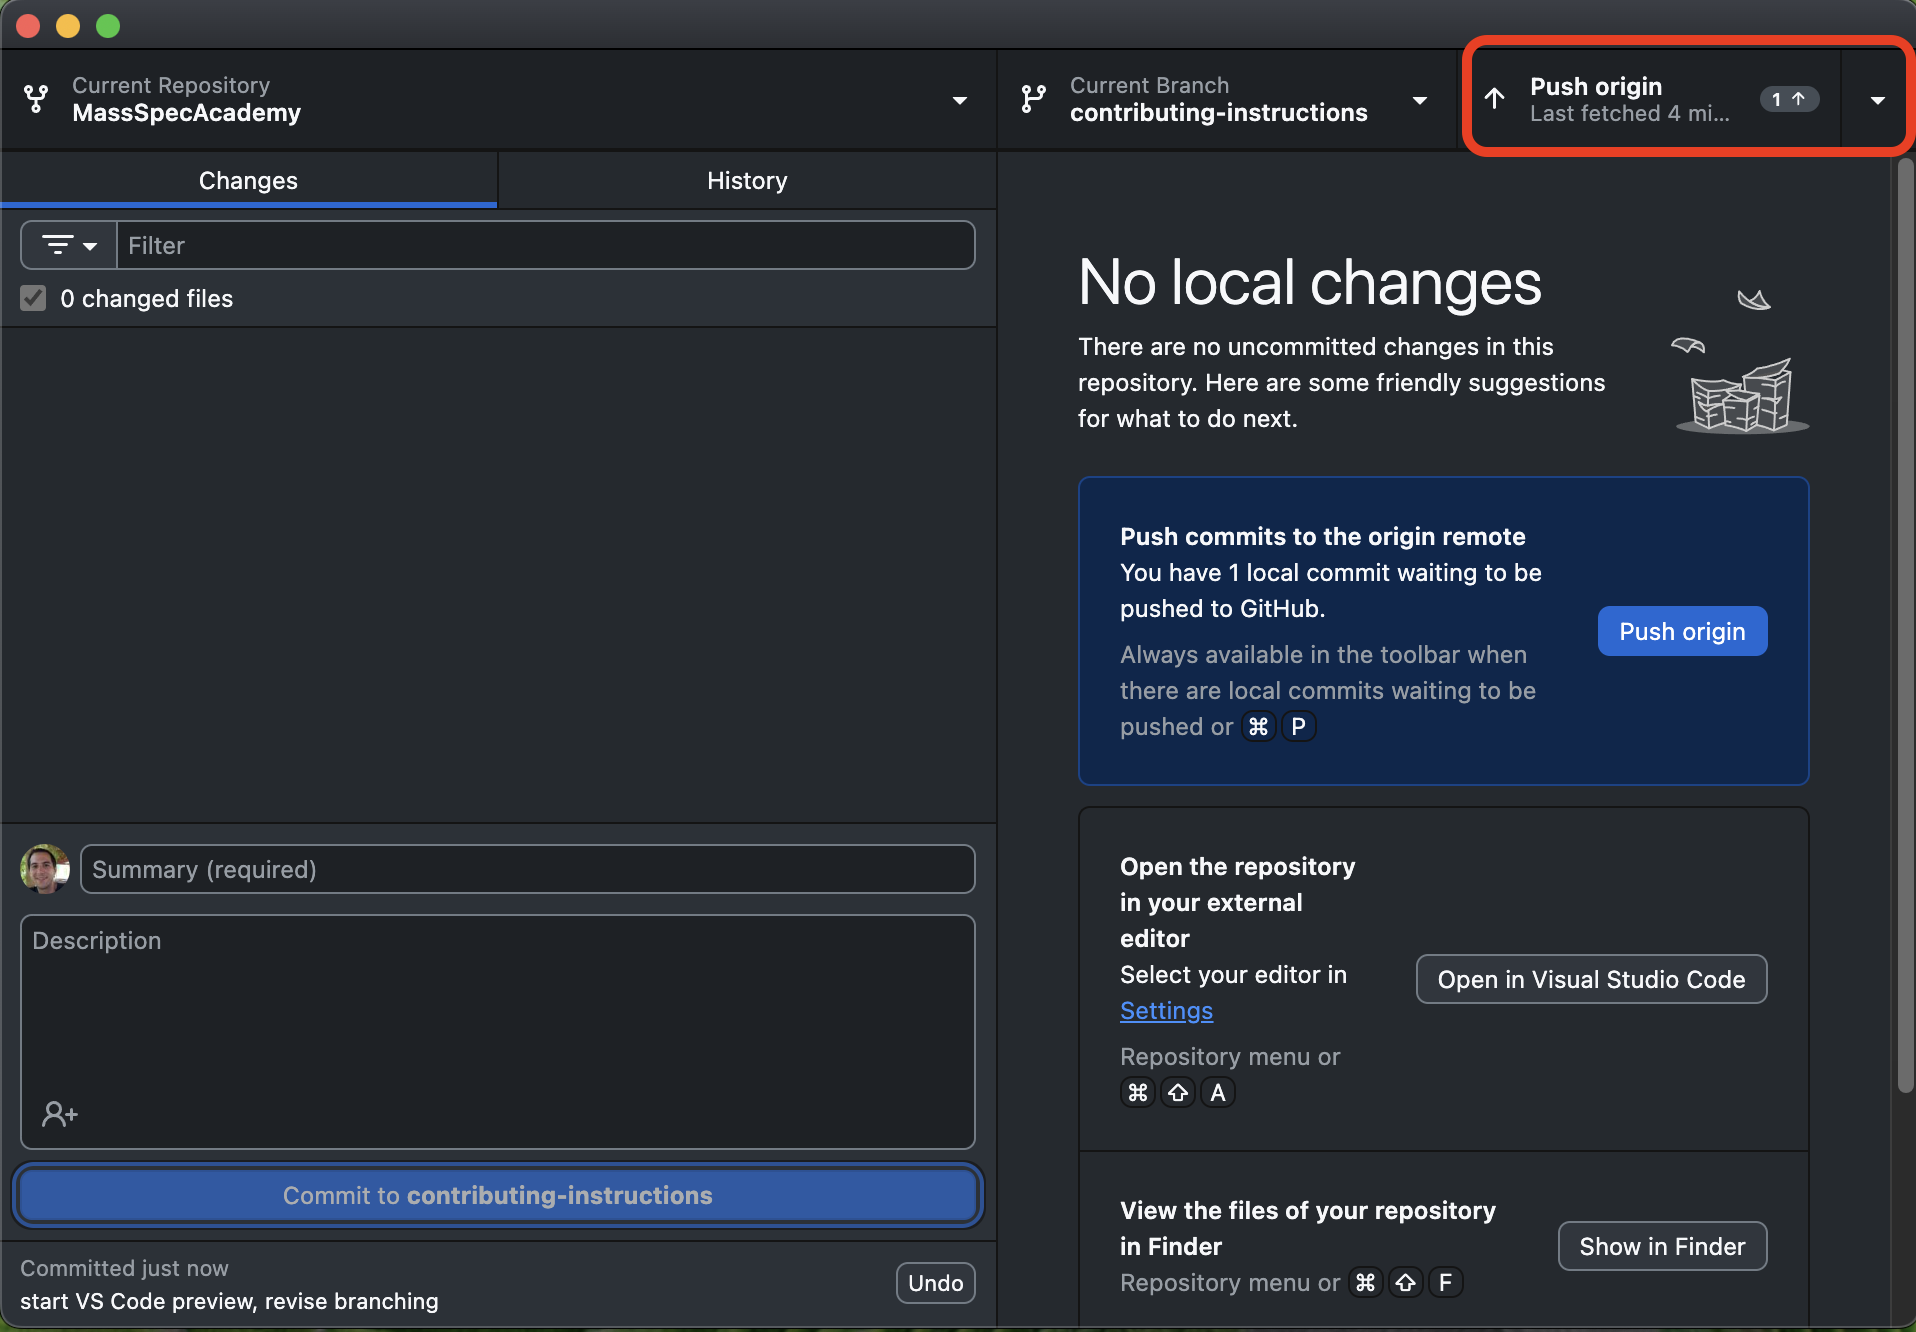
When you’re done, hit the blue “Commit” button at the bottom left of the GitHub Desktop window. Your changes have now been wrapped up as a commit in the local version of your MassSpecAcademy repository on your computer. To synch the commit with your forked GitHub repository online, called “origin”, click the “Push origin” button at the top right of the GitHub Desktop window.
5. Create a Pull Request
At any time after you’ve made the first commit to your new branch, you can open a draft pull request, which alerts everyone working on the upstream EARTHTIME/MassSpecAcademy repository that you have some changes you’d like to eventually merge into the main repository. You can keep making commits to your branch, which then get added to the draft pull request. When the branch is ready, you’ll indicate that your work is “Ready for review.” Stephen and Noah will make sure it doesn’t break anything, then merge it into the main repository, which will update the website automatically.
To create a draft pull request, click on the “Current Branch” dropdown button at the center top of the GitHub Desktop window. There are two tabs for the dropdown, “Branches” and “Pull Requests.” Click the “Pull Requests” tab to see a blue text link that offers to open a new pull request for you.
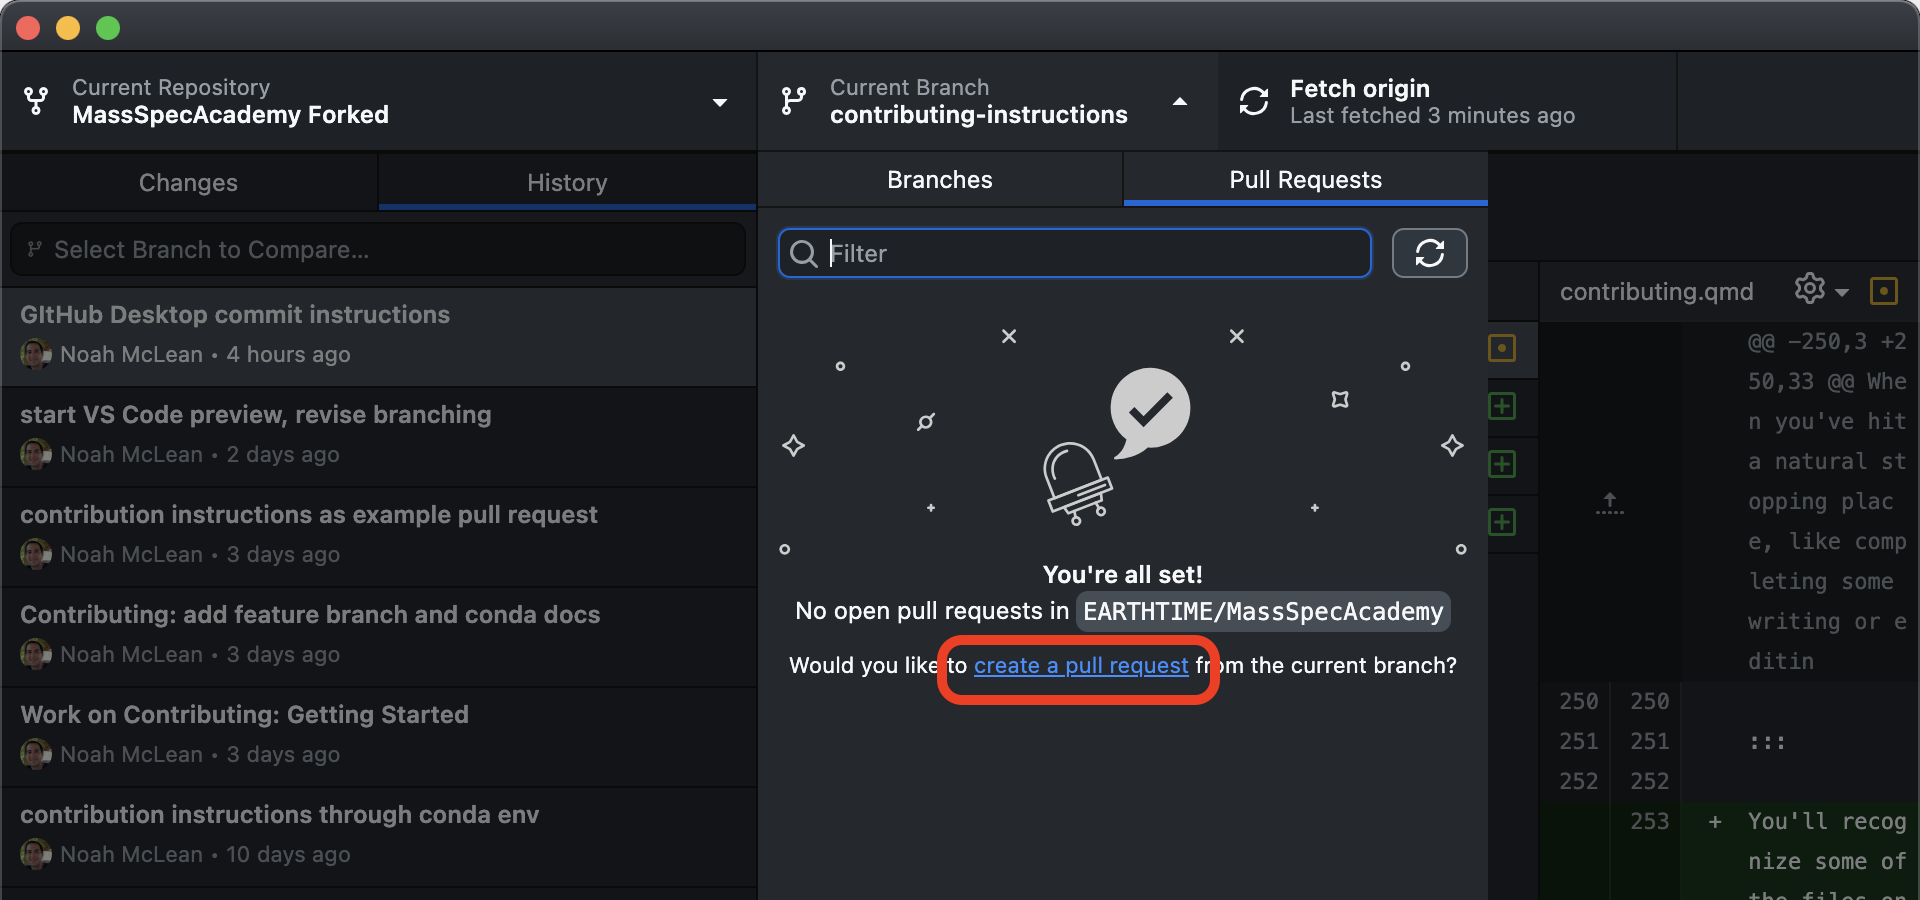
Clicking the blue link to “create a pull request” will open a new browser tab at the EARTHTIME/MassSpecAcademy repository. If you don’t see the little spaceship drawing, you can also go to the main menu at the top of the screen, click “Branch”, then “View Pull Request on GitHub.”
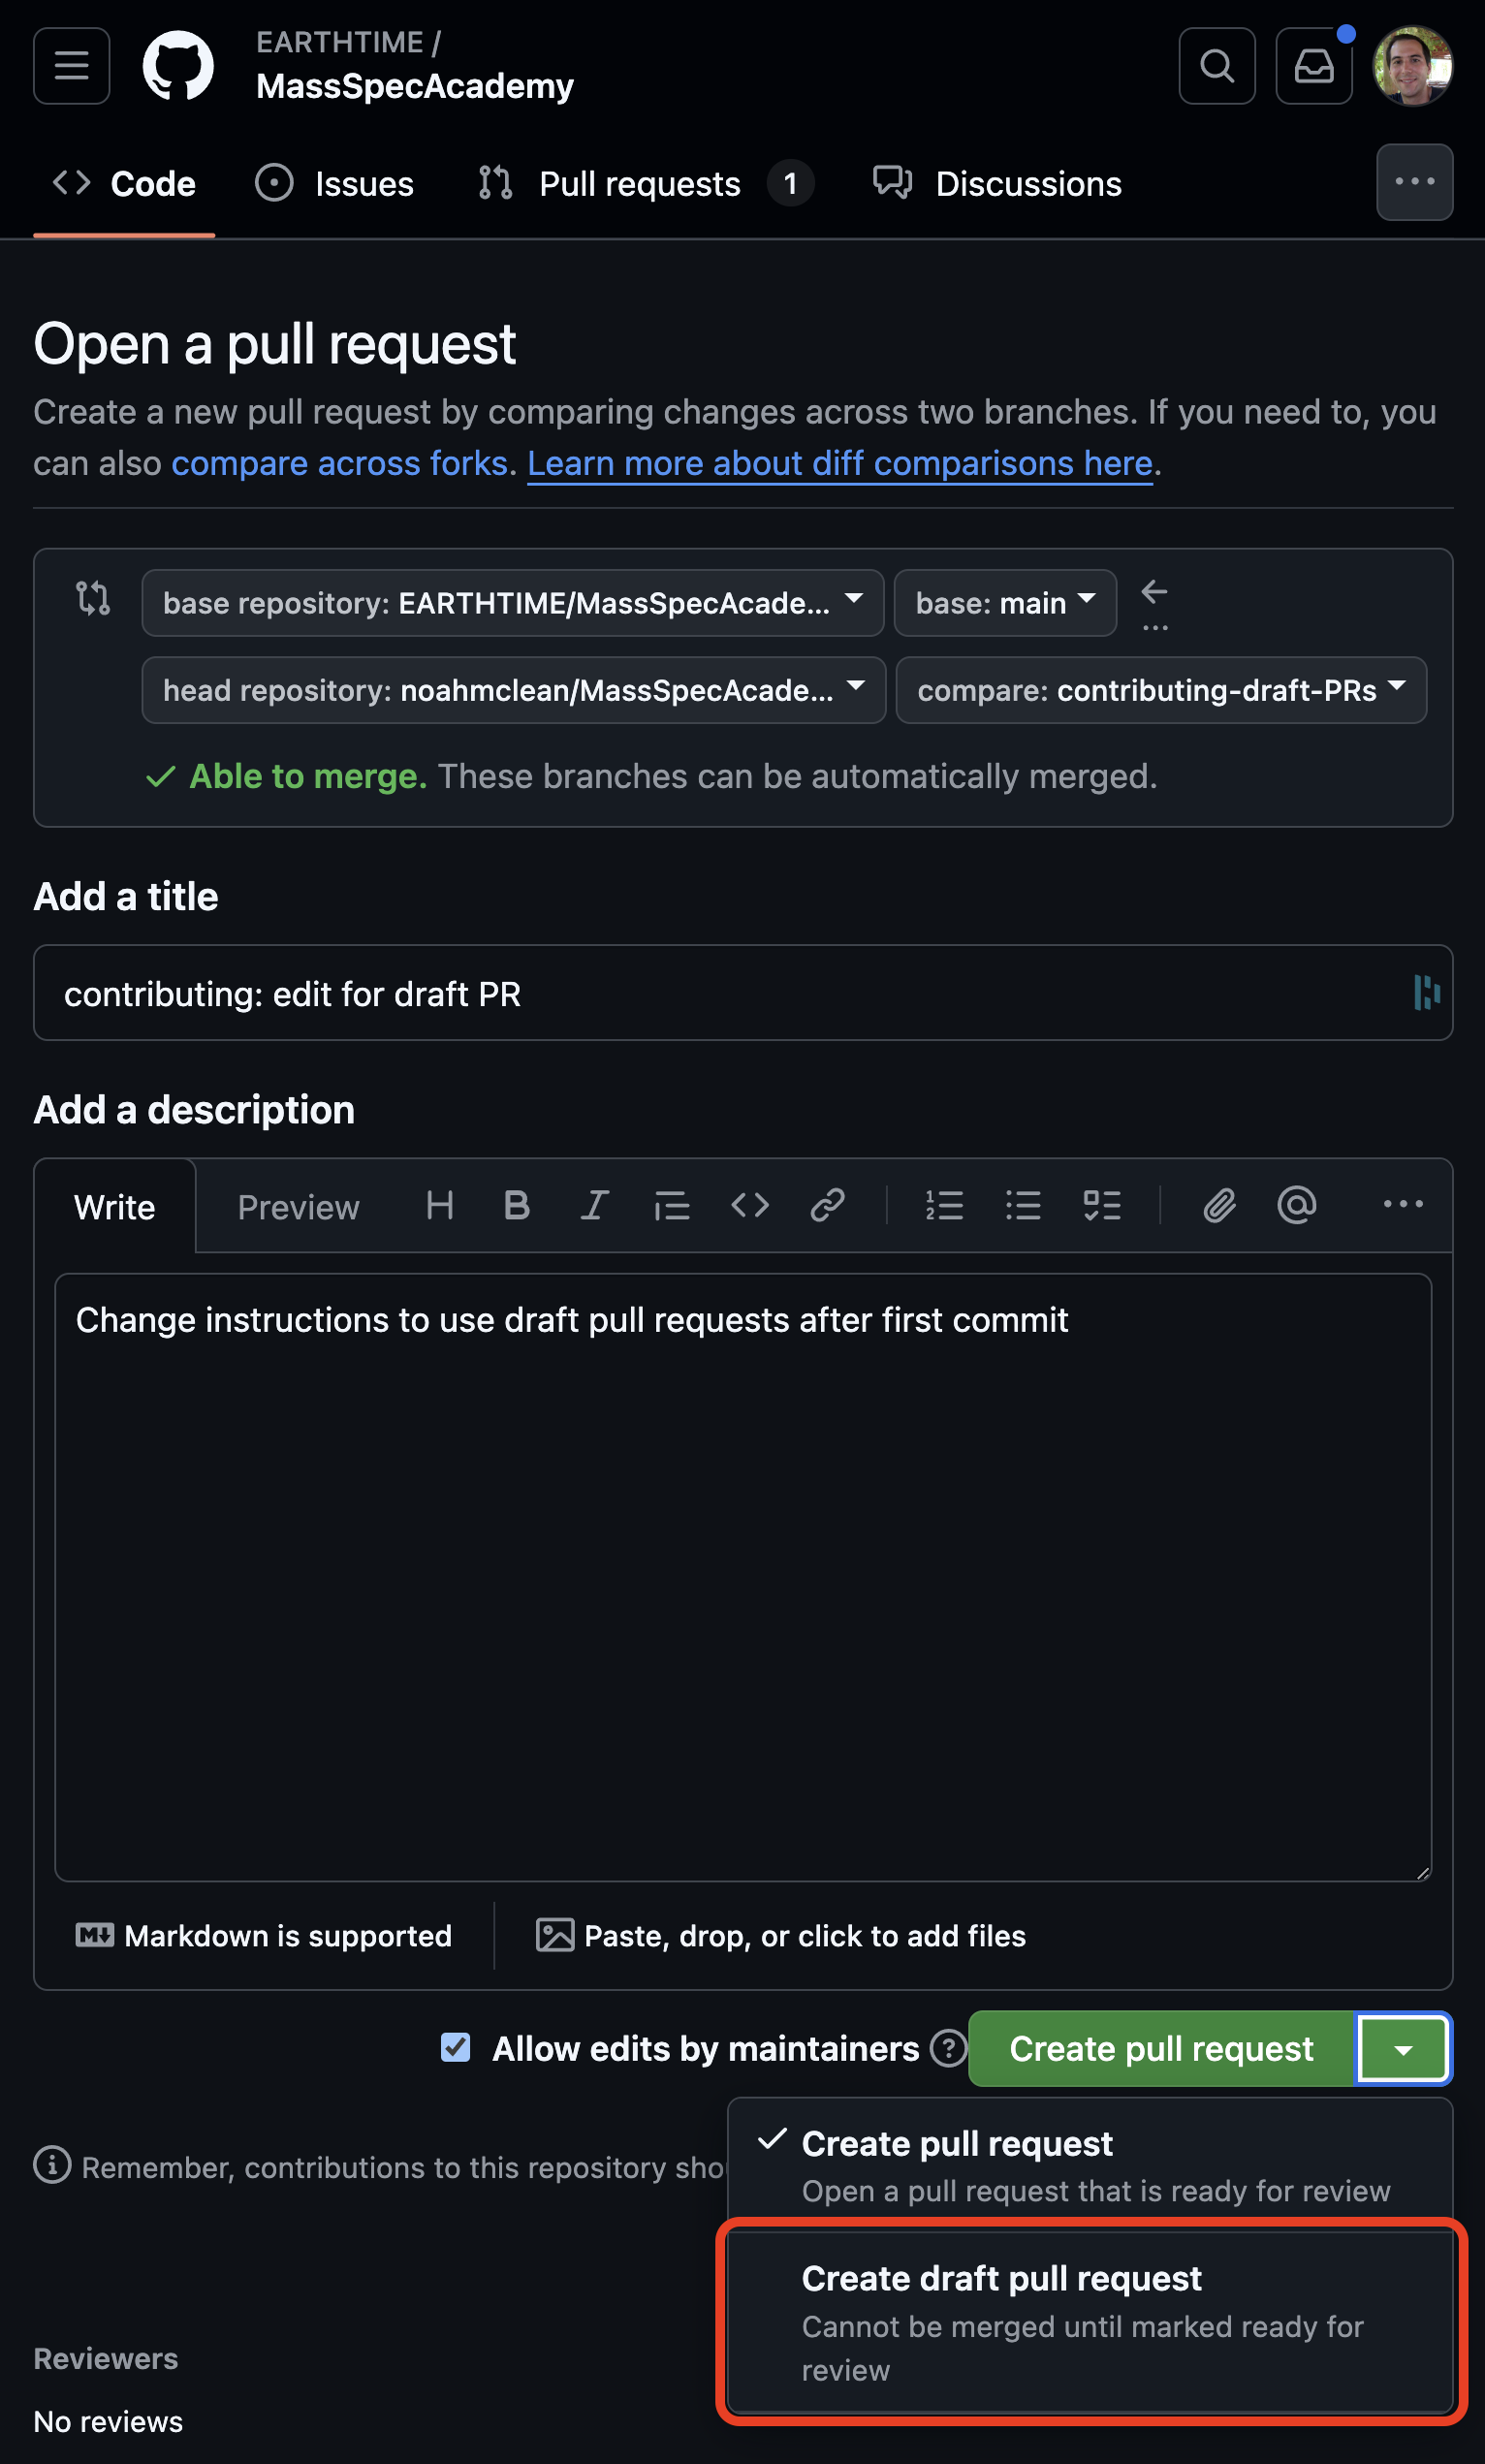
The EARTHTIME/MassSpecAcademy GitHub.com page will be pre-populated with all the right selections for creating a new pull request from the branch in your forked repository that you’ve been working on. Enter a good summary and description for what you plan to contribute in this pull request (e.g., “update SIMS figures” or “add chapter on calutron history”). Then click the dropdown arrow next to the green “Create Pull Request” button and choose “Create draft pull request”:
You can go to https://github.com/EARTHTIME/MassSpecAcademy/pulls to see all the other open draft pull requests, which represent others’ in-progress contributions. Click the link for a pull request to read the commit messages and see how each project is progressing, and click a link to a commit to view its contents. This way, even though everyone is working on their own personal copy of the code on their own computer, you can get a sense of what others are doing. The pull requests page on the central repository linked above also serves as a discussion page – you can leave comments, ask questions, and make suggestions here, and the author will be notified by with an email from GitHub.
Get contributing!
Now that you have all the software installed and infrastructure in place, you should be able to add and edit content using the Quarto plugin for VS Code, previewing the results in a browser window as you write. When you’ve completed a task or chunk of text, you can commit those changes to your local repository on GitHub Desktop and push those changes to your online forked repository on GitHub.com.
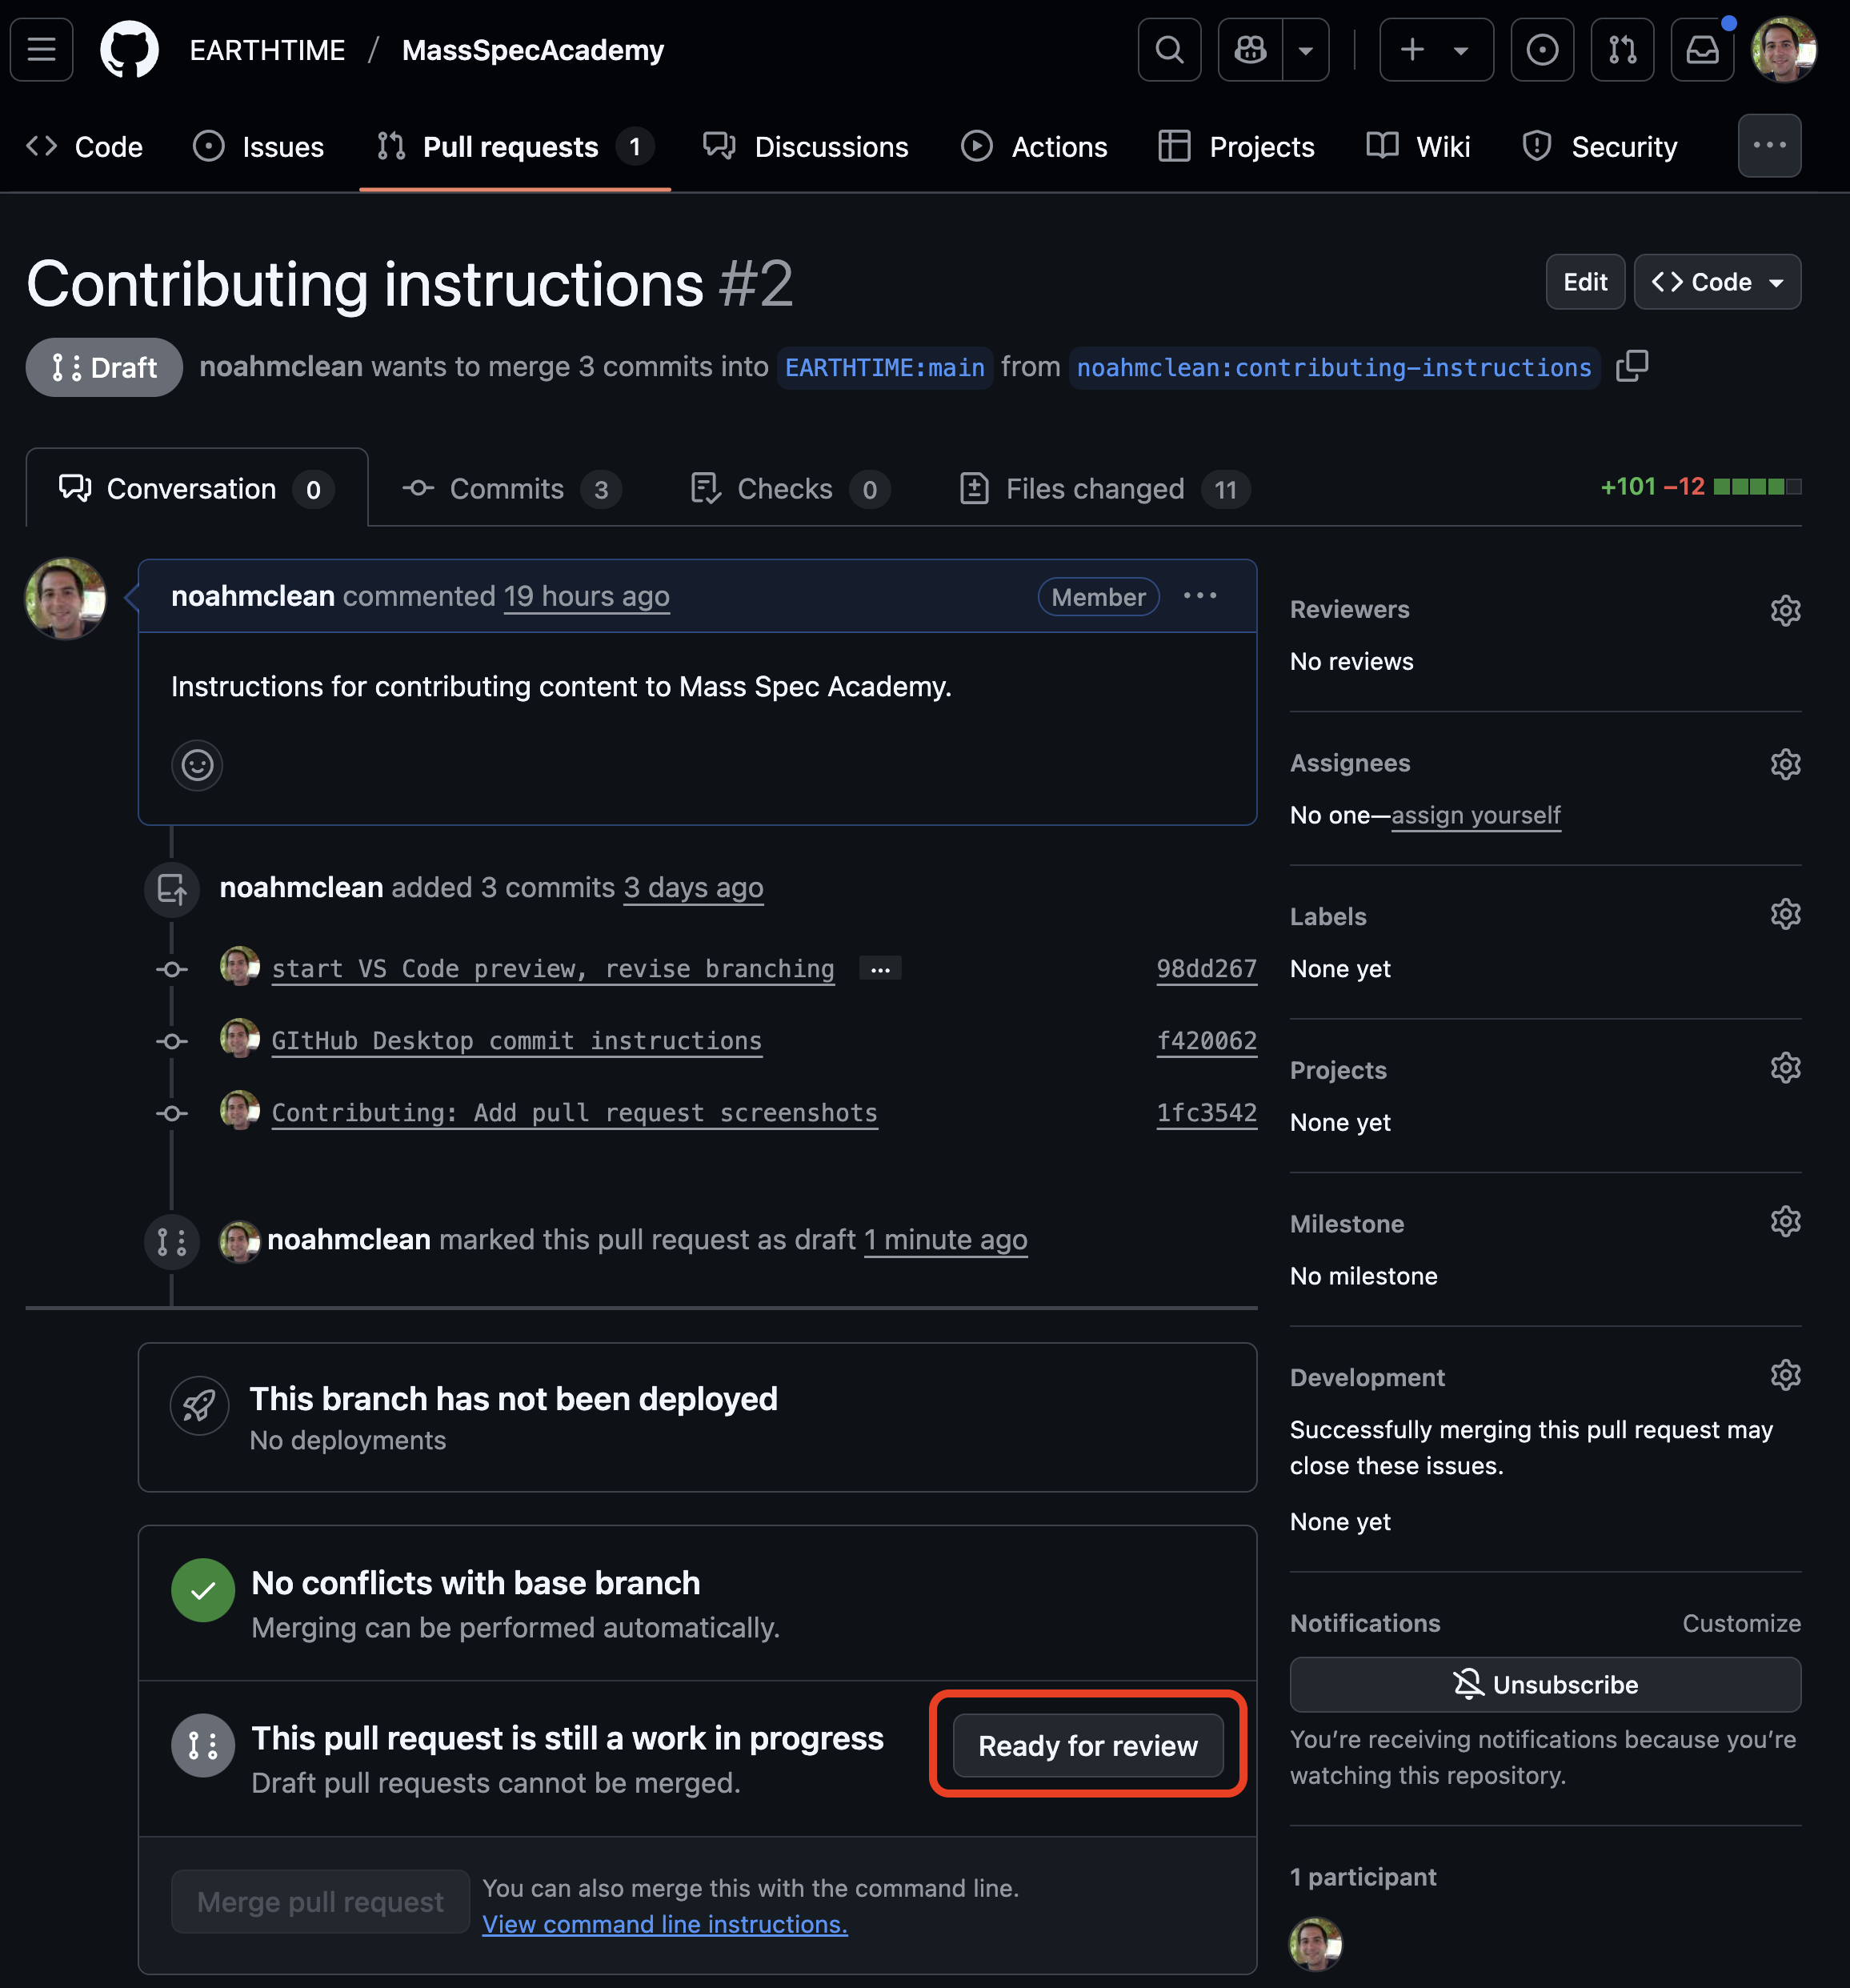
When your content is ready to be added to the upstream EARTHTIME/MassSpecAcademy repository and the website, then change your draft pull request to a submitted pull request, which tells Stephen and Noah it’s time to review and merge your branch. To do this, go to https://github.com/EARTHTIME/MassSpecAcademy/pulls, make sure all of your commits are present, and then click the “Ready for review” button:
Once your branch is merged, you can check https://massspec.academy/ to see it live – new content should appear in about a minute.
Workflow:
The contribution process now looks like:
- Start another branch with a new name for your new task in GitHub Desktop,
- create some new content in VS Code,
- commit the content on GitHub Desktop with a descriptive commit message,
- create a draft pull request using GitHub Desktop and GitHub.com,
- keep writing and committing as you go, then
- when you’re done, indicate on GitHub.com your pull request is ready to review.
Code additions
The current conda environment includes Python 3.13 and Jupyter notebook requirements along with numpy, pandas, matplotlib, seaborn, and bokeh. If you need additional requirements for the code you wish to include in Mass Spec Academy, then you can add them to the environment, then export them to the environment.yml file.